Use the printer friendly button

Use the "printer friendly" button when printing a recipe.

Saturday, October 6, 2018

Sweet Onion Dip ("Crack Dip")

SWEET ONION DIP - AKA "CRACK DIP"


COURSE: DIPS

TOTAL TIME: 1 HOUR 15 MINUTES
 SERVINGS: 6 SERVINGS
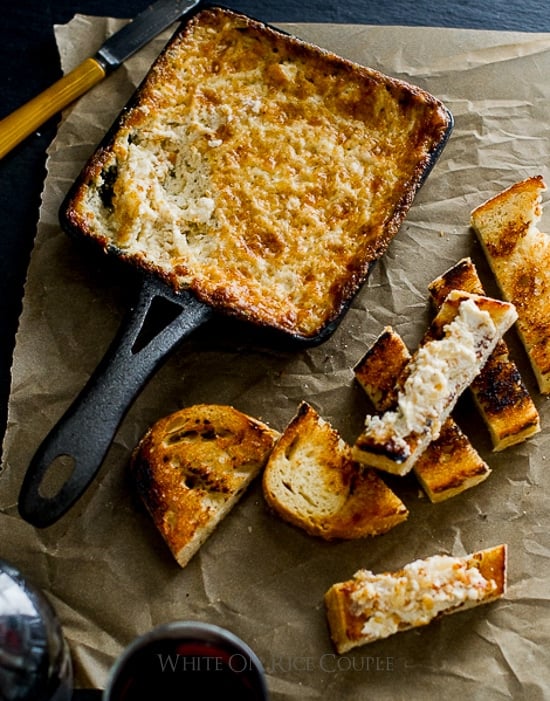


Hot Sweet Onion Dip Recipe "Crack Dip" is an easy Hot Onion Dip Recipe for Game Day Dip Appetizers | @whiteonrice from WhiteOnRiceCouple.com

We first shared this recipe in 2008 and it's so popular that we wanted to also share it again in our cookbook, Bountiful. This dip was dubbed "crack dip" by friends who were over for an evening feast due to it's addictive nature. The name stuck and we've been calling that ever since. We've traditionally have served the dip with crackers or charred sliced of bread, however, with several friends needing gluten-free options, we've started serving it with crunchy vegetables such as radishes, jicama, celery, and carrots instead. We actually like the way the veggies help balance the richness of the dip better than that of the crackers or bread. It is also great to serve with heirloom tomatoes in the summertime. We'll also often make big batches, and then just dish out the un-baked dip into baking containers and then bake it whenever we need to serve it over a week or two span.
Mayo Substitution NOTE #1: Greek Yogurt is not a good substitution for mayo. There is a huge fat content difference between yogurt and mayo. Greek yogurt makes the dip dry. This dip is decadent and not meant to be healthy, so only possible substitution for mayo we can think of that might work is sour cream.
Oily Dip? Note #2: Each brand of mayo is different and some may result in an oily dip. We use Best Foods Brand, also similar to Hellmann's Mayo. Also, do not use more than 1 cup of mayo and don't pack it in the cup when measuring. Loosely fill the cup so you don't end up with too much. If you pack the mayo tightly in the measuring cup, it will be too much. Another reason for oily dip is because you're using the powdered parmesan cheese product in the green containers. Treat yourself to good freshly grated parmesean from the parmesan wedge and you will definitely taste a difference.

INGREDIENTS

  • 1 (8-ounce / 225-g) package cream cheese (at room temperature)
  • 1 cup (240ml) mayonnaise (preferably Best Foods brand)
  • 1 cup (100g) freshly grated Parmesan cheese (not the powdered cheese stuff in the green containers)
  • 1 cup (160g) diced sweet onion (sometimes we like to add extra 1/2 cup for more flavor and texture)
  • 2 teaspoons freshly cracked black pepper

DIRECTIONS

  1. Preheat the oven to 350°F (175°C).
  2. In a bowl, mix together the cream cheese, mayonnaise, Parmesan, onion, and black pepper and until everything is thoroughly combined.
  3. Pour the mixture into a 6-inch (15-cm) baking dish or any oven-safe dish. Bake for 50 minutes to one hour, till everything is melted together. When the top crust is brown and almost burnt-looking, the dip is ready. The darker brown the crust becomes, the better the flavors are.
  4. Serve with your favorite crusty bread, crackers, slices of tomatoes, or crunchy vegetables such as radishes, jicama, carrots, and celery.


Monday, September 3, 2018

Lemon drop martini

Lemon Drop Martini

https://www.geniuskitchen.com/recipe/lemon-drop-martini-88364


INGREDIENTSNutrition

DIRECTIONS

  1. Chill martini glasses in freezer for at least 10 minutes prior to serving.
  2. Place Vodka, Triple Sec, lemon juice and sugar into a cocktail shaker with 4-5 ice cubes and shake vigorously for 30 seconds.
  3. Run the lemon twist around the edge of the chilled martini glass and dunk in a small amount of sugar for a coated rim.
  4. Pour the strained martini into the chilled glasses and serve.

Thursday, July 26, 2018

Perfect Hard Boiled Eggs

From Martha Stewart

https://www.marthastewart.com/354061/perfect-hard-boiled-eggs

One Dozen Eggs

1.  Place eggs in a large saucepan. Cover them with cool water by 1 inch. Slowly bring water to a boil over medium heat; when the water has reached a boil, cover and remove from heat. Let sit 12 minutes.

2. Transfer eggs to a colander; place under cool running water to stop the cooking. Eggs can be peeled and served immediately.

Friday, March 23, 2018

72-hour pizza dough

From South Shore Living magazine, March 2018 issue, "Baking with Steel" article about Andris Langsdin, founder of The Baking Steel Company.

One of my favorite pizza dough recipes is Jim Lahey's no knead dough, on which this recipe is based. It's simple, doesn't require any equipment and doesn't make a big mess. (My wife disagrees about the mess I have a talent for covering the kitchen and flour.) I make this dough at least once a week, sometimes quintupling the recipe and saving the extra balls of dough to use later for the pizza classes I teach.

Through the years I have adapted Jim's original to make it my own. One change is that I use bread flour instead of all purpose flour, which adds the perfect heft to your crust when the dough is baked and high heat in a home environment. And somewhat ironically, I actually need the no knead dough. After I incorporate all the ingredients, I wet my hands and knead the batch for 2 to 3 minutes. Without this step I've ended up with dry clumps of flour in the dough. There are worse things in life, but we're seekers of pizza perfection.

This dough is simple and foolproof, but you do need time. Not hands-on or working time, but 24 hours for rising and then 48 hours for the cold for fermentation. That's 72 hours total, in case you don't have a calculator.

The first 24 hours allows the dough to bulk ferment (or rise as one unit) before being divided into individual dough portions at room temperature. Just park the dough someplace where it won't be disturbed. The dough will release a pleasant aroma that will make your kitchen smell like a bakery.
Next, you will portion out the dough, ball it up, and store the balls in the refrigerator for a minimum of one day and up to 10. This is when the dough will develop some kick ass flavor. The process is called cold fermentation, and it slows down the activity of the yeast to produce amazing flavors in your dough. The strike zone for the dough, in terms of optimal texture and flavor, is from day 3 through day 5 or 48 to 96 hours after the bulk fermentation that occurs in step 4 below. You can take the dough out of the fridge and make pizza earlier, but the full 72-hour method is what gives it a truly memorable taste and texture.

     This dough recipe makes four 10" pies, three 12" - 14" inch pies, or one 18" by 13" in Sicilian pie.
Ingredients
  • 500 grams (3 3/4 cups) bread flour 
  • 16 grams (1 tablespoon) fine sea salt 
  • 1 gram (1/4 teapoon) active dry yeast 
  • 1 1/2 cups water, at room temperature

  1. In a large bowl, whisk together the bread flour, salt, and yeast.
  2. Slowly add the water and mix with a wooden spoon just to combine. Once the mixture is moistened, lightly flour a counter top or large cutting board and remove the dough from the bowl with lightly oiled or wet hands to discourage sticking. Knead for 2 to 3 minutes to remove clumps; the dough won't become elastic but should easily form a loose ball.
  3. Place the dough in a lightly oiled bowl and cover with a damp, clean kitchen towel or plastic wrap to prevent it from drying out.  
  4. Place the bowl on the counter and lit it sit 24 hours at room temperature.  It will double in size and you may see bubbles forming on the surface.
  5. Lightly flour a large cutting board or your kitchen counter top and place the dough on it.  Wet or lightly oil your hands again.
  6. Divide dough into 4 equal portions for 10" pies, or 3 portions if you'r making slightly larger pies.  With wet or oiled hands, make each portion into a dough ball.
  7. Place the dough balls into oiled, cylindrical, airtight containers (deli takeaway containers are ideal), date them, and place in the fridge for 48 - 96 hours.
  8. Remove from refrigerator at least 1 hour before use to allow the dough to come to room temperature.  This lets the gluten relax and makes the dough malleable.

Monday, January 29, 2018

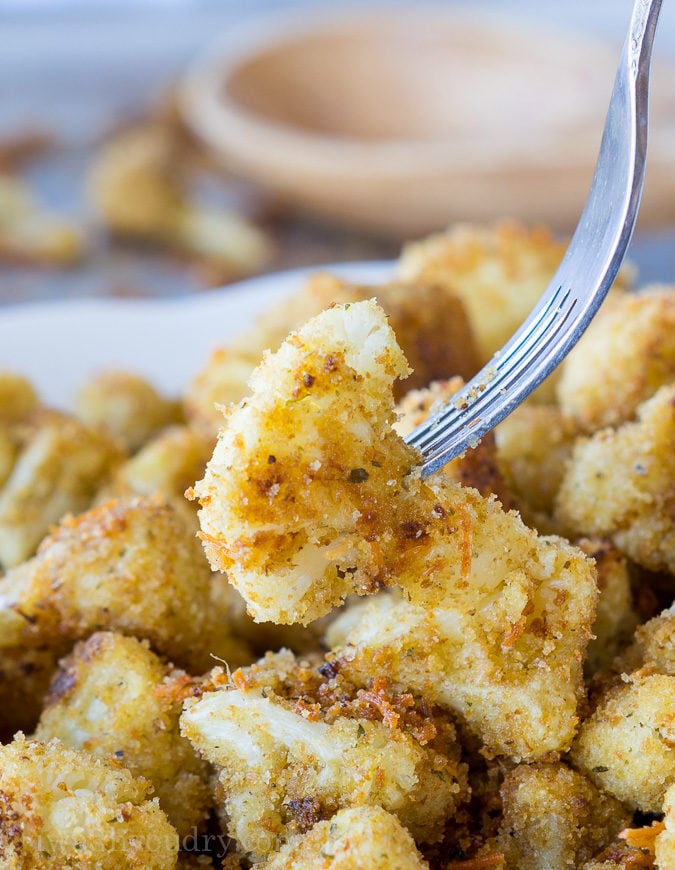
Parmesan Crusted Cauliflower

These Parmesan Roasted Cauliflower Bites are so easy to make and taste absolutely phenomenal. My whole family devoured the pan.

Parmesan Roasted Cauliflower

These Parmesan Roasted Cauliflower Bites are the perfect quick and easy side dish, or double as a vegetarian baked chicken nugget!

Ingredients


  • 7 cups cauliflower florets, cut to bite sized pieces
  • 3 to 4 tbsp olive oil
  • 1 cup Italian bread crumbs
  • 1/2 tsp garlic powder
  • 1/2 tsp salt
  • 1/3 cup parmesan cheese

Instructions

  • Preheat oven to 425 degrees F. Line a large, rimmed baking sheet with foil and spray liberally with non-stick cooking spray. Set aside.
  • Combine the cauliflower and olive oil in a large zip close bag and shake to coat.
  • Add the remaining ingredients to the bag and shake until coated, pressing slightly to help the breading stick. 
  • Pour onto the baking sheet and spray the tops of the cauliflower with cooking spray and bake for 20 minutes. 
  • Stir the cauliflower and continue to bake an a additional 10 minutes.  Serve hot.

Friday, December 15, 2017

Pretzel M&M Hugs (Christmas Style)

Ingredients

  • 70 square pretzels (do NOT use butter snaps)
  • 70 Hershey's Hugs chocolates (from nearly 1 full 12 oz package), unwrapped
  • 70 Milk Chocolate M&M's , I used the red and green Christmas package

Instructions

  1. Preheat oven to 200 degrees. Line a cookie sheet with a Silpat or parchment paper. Align pretzels on cookie sheet in a single layer then top each pretzel with one Hershey's Hug chocolate. Bake in preheated oven for 4 - 5 minutes, until the chocolate is shiny and soft (but NOT melting, the chocolates should still hold their shape).
  2. Remove from oven and carefully place one M&M in the center of each soft Hug and press down on M&M to spread the chocolate. Place in refrigerator and allow to rest until chocolate has set, about 5 minutes. Store in an airtight container.

Easy Jam Thumbprint Cookies


Laura is making these cookies for her Junior League 2017 holiday cookie swap.


Wednesday, December 13, 2017

Elaine's Scottish Shortbread


Elaine Garvey loved this shortbread, and loved making it for friends and family each Christmas. 
The plain shortbread is delicious, and you can make variations by adding chocolate chips, dried fruit or nuts.  Start checking at 40 minutes.  At 45 minutes it sometimes come out a bit too brown and crispy.

Ingredients:

  • 1 1/2 cups sifted flour
  • 3/4 cup confectioner's sugar
  • 1/4 tsp. salt
  • 1/2 lb. butter (2 sticks) softened to room temperature

Cooking Directions:

  • Preheat oven to 325 F.
  • Mix all ingredients together.  Knead thoroughly until the consistency becomes doughy.  Press very firmly into mold, making sure that dough fits into every part of surface.
  • Bake in a preheated oven approx. 40-45 minutes, or until shortbread is lightly browned and still somewhat springy to the touch.  
  • Let cool in mold (at least 1 hour), and then run knife around the perimeter of the shortbread to loosen it from the mold.  Remove to rack.