Use the printer friendly button

Use the "printer friendly" button when printing a recipe.

Sunday, January 8, 2023

Bleu Cheese Stuffed Dates with Bacon and Celery Salad

From the Boston Globe Magazine, November 19th, 2006

Ingredients:
  • One slice 1/2 in thick slab bacon (or just buy thick sliced bacon)
  • 12 pitted dates
  • 1/3 cup crumbled blue cheese
  • two stalks celery, peeled and thinly sliced
  • 1/2 cup celery leaves
  • 2 tsp white wine vinegar
  • one tablespoon olive oil
  • salt to taste

Directions
  • Set the oven to 350°.  Have on hand a small skillet with a heat-proof handle and a small baking dish. 
  • If using a slab of bacon, slice it into 12 pieces. Transfer to the skillet and cook in the oven for 8 to 10 minutes or until it is crisp. Drain on paper towels. 
  • Stuff each date with one teaspoon of blue cheese. 
  • Set the dates in the baking dish and bake for 4 minutes or until they are just warm. 
  • In a bowl, toss the celery, spices and leaves, vinegar, and olive oil. Sprinkle with salt. 
  • Cut the cooked bacon into pieces small enough to fit into a date.
  • Top each date with a piece of bacon and garnish with celery salad.

Tuesday, December 27, 2022

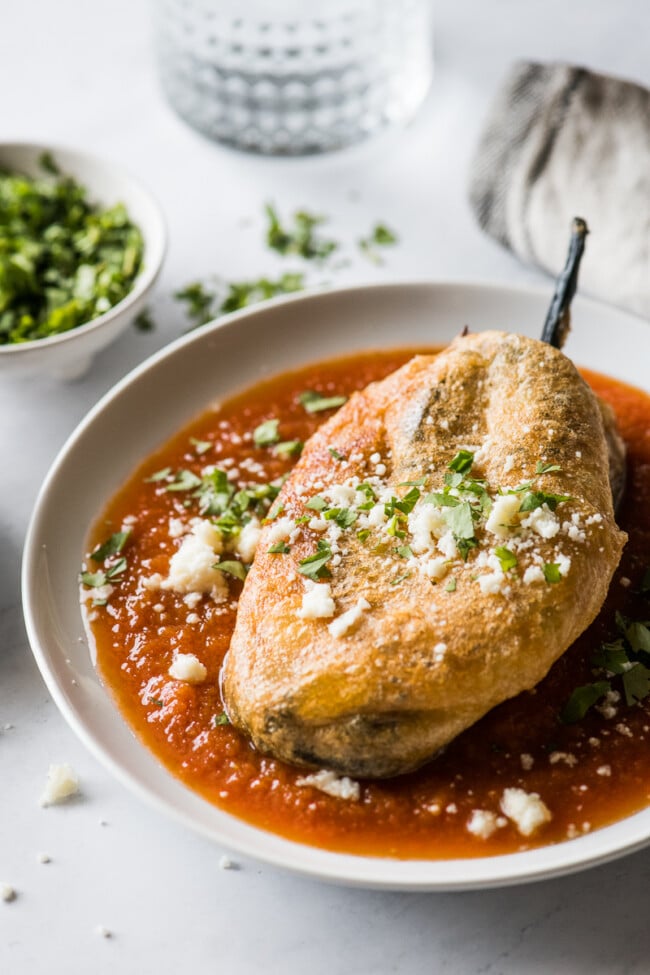
Chile Relleno

An authentic chile relleno recipe made from roasted poblano peppers stuffed with cheese, dipped in a fluffy egg batter and fried until golden brown!

Prep Time: 30 mins;  Cook Time: 15 mins;  Total Time: 45 mins

Servings: 6 servings (1 chile each) Calories: 334

Author: Isabel Eats

Equipment

  • Toothpicks, for securing the stuffed peppers

Ingredients

  • For the chile rellenos
    • 6 large poblano peppers
    • 8 ounces Monterey Jack cheese, cut into long strips/sticks (or shredded cheese)
    • 4 cups oil, for frying
    • 3 large eggs
    • 1/2 cup all-purpose flour
    • 1/2 teaspoon table salt
  • For the salsa roja
    • 6 roma tomatoes, quartered
    • 1/2 small onion, halved (yellow or white)
    • 3 cloves garlic
    • 1 jalapeno, stem and seeds removed (optional)
    • 5 sprigs cilantro
    • 1 teaspoon coarse kosher salt, plus more to taste
    • 1 teaspoon olive oil

Instructions

For the chile rellenos

  1. Roast the peppers: Line a large baking sheet with aluminum foil and place poblano peppers on top. Set your oven rack directly underneath the broiler and turn the broiler on.
  2. Broil poblanos for 5 minutes, or until the skin is blackened and blistered. Carefully flip them over and broil for another 5 minutes, or until the skin is blackened and blistered.
  3. Remove them from the oven and loosely cover the baking sheet with aluminum foil or plastic wrap to keep in some of the heat and help them steam. Let them sit for 5 minutes.
  4. Peel the peppers: Peel and rub off as much of the loose skin on the peppers as possible. It doesn't have to be perfect, just as much as you can.
  5. Cut a small slit down the middle of the peppers with a knife. (If you don't want the peppers too spicy, you can remove some of the seeds. I like to leave them in as poblanos aren't typically super spicy to me, but that's personal preference.)
  6. Stuff the peppers: Carefully stuff the peppers with the cheese. Some of the peppers will be extra fragile because of the roasting process and may tear - that's okay. Just do the best you can.
  7. Gently close the opening of the peppers and secure it shut with 1-3 toothpicks. Use as many as you need to ensure that the cheese won't ooze out during the frying process. Set aside.
  8. Prepare for frying: Heat the oil frying oil in a large saucepan or deep skillet over medium-high heat. Line a baking sheet with paper towels and set aside. While oil is heating up, prepare the batter.
  9. Make the batter: Separate the egg whites from the yolks into two separate bowls - the whites into a large mixing bowl and the yolks into a small bowl. Using an electric hand mixer, beat the egg whites until stiff peaks form.
  10. While continuing to beat the egg whites on low, add in the egg yolks one at a time until all of them are fully mixed in. The batter should be light, fluffy and smooth.
  11. Coat the peppers with batter: Place the flour and salt into a separate shallow bowl or plate. Mix together to combine. Gently roll the stuffed peppers in the flour mixture, then give them a gentle tap to remove any excess. Then dip them in the egg batter and gently place them in the hot frying oil.
  12. Fry the chile rellenos: Fry the peppers for 3-5 minutes per side, until the batter is golden brown and crispy. Try not to overcrowd the peppers in the pan - I usually fry 2 at a time depending on the pan I'm using.
  13. Transfer the peppers to the lined baking sheet to drain off any excess oil.

Serve: Immediately serve chile rellenos on a plate with some salsa, freshly chopped cilantro and some cotija cheese. (Don't forget to remove the toothpicks when you first cut into the peppers! You can try to remove them before serving onto plates, but I find it easier to remove them when you first cut into them.)

For the salsa roja

  1. Add tomatoes, onion, garlic, jalapeno, cilantro and salt to a blender. Puree until smooth.
  2. Heat olive oil in a small saucepan over medium-high heat. Add blended salsa and bring to a boil.
  3. Reduce heat to low and simmer, stirring occasionally for 8 minutes. Remove from heat, taste and season with more salt if desired.

Notes

Make ahead.  The poblanos can be roasted and peeled up to 2 days in advance. The salsa roja can be made up to 3 days in advance. Both should be kept in the fridge until ready to use.

Buy the largest poblano peppers you can find. That way you can stuff the peppers with a lot of filling and you won’t have any leftovers.

Use a different cheese. Feel free to use another type of cheese if that’s all you have. Traditionally, chile relleno is made with Oaxaca cheese, but you could also use mozzarella, cheddar, provolone or another good melting cheese.

Add a different filling. To make this a more well-rounded one-chile meal, feel free to mix in some other ingredients to the filling. Some good options would be carnitas, shredded chicken or picadillo.

Don’t overcrowd the frying pan. I typically fry two chile rellenos at a time even though the pan could fit three.

Nutrition:

Serving: 1pepper | Calories: 334kcal | Carbohydrates: 16g | Protein: 15g | Fat: 24g | Saturated Fat: 9g | Cholesterol: 127mg | Sodium: 635mg | Potassium: 523mg | Fiber: 4g | Sugar: 6g | Vitamin A: 1699IU | Vitamin C: 145mg | Calcium: 321mg | Iron: 2mg

Sunday, December 18, 2022

Velvety Chocolate Mousse


DECEMBER 12, 2022

BAKING Together Recipes

Velvety Chocolate Mousse

Elegant and easy, this is the make-ahead holiday dessert you've been looking for.

BY ABIGAIL JOHNSON DODGE


For this year’s holiday recipe for Cook the Vineyard, I’m sharing my easiest and most delicious chocolate mousse. No eggs involved here – just five ingredients. And the recipe can and should be made entirely ahead. Everything to love about that! I’ve also given you some fun topping ideas and flavor variations. For all my tips — and a recipe for chocolate shards — be sure to read Baking Together #30 before making the mousse. (Serving ideas are included in Kitchen Notes at the end of this recipe, too.)

Makes 4 servings

  • 1 2/3 cups (13 1/4 ounces) heavy cream
  • 6 ounces bittersweet chocolate, chopped
  • 4 tablespoons (2 ounces) unsalted butter, cut into 4 pieces
  • 2 teaspoons bourbon, other liqueur, or pure vanilla extract
  • Pinch of salt
  • Lightly sweetened whipped cream, chocolate shavings or shards or other toppings (see notes below) 


1. Put the heavy cream and chocolate in a medium, heatproof bowl. Microwave in 30 second bursts, stirring in between, until the cream is very hot and the chocolate is melted and the mixture is smooth. (This can also be done by setting the bowl over a pot of simmering water). Repeat the microwaving as needed if there are any stubborn chocolate bits. Add the butter pieces to the warm mixture and stir gently until the butter has melted. Stir in the bourbon (or other liqueur or vanilla) and salt.


2. Chill, stirring occasionally, until thick and very cold, about two hours or up to two days. (For faster cooling, set the bowl over a larger bowl filled with ice and a little water, stirring and scraping the sides frequently until very cold.)


3. Using an electric handheld mixer, beat the chilled mixture on medium-high speed until thick enough to hold medium-firm peaks on a spatula, 1 to 2 minutes, stopping occasionally to scrape down the sides of the bowl. (Note, if using a standing mixer, the whipping goes very fast – don’t walk away or you may overbeat the mixture. You want it to be creamy and somewhat stiff, but not grainy.)


4. Spoon or pipe the mousse into serving cups or small bowls. If serving right away, top with whipped cream and chocolate shavings or shards (if using) or other toppings. Or vary your presentation by layering with other ingredients. Alternatively you can cover the mousse cups (without topping) and refrigerate for up to two days.

KITCHEN NOTES

Double the recipe

Serving a larger crowd? Double or triple it up! Just remember to use a bigger bowl for the larger amount of ingredients and allow more time for chilling the chocolate mixture before whipping.


Pipe with a zip-top bag

If you want to pipe your mousse into cups, a zip-top plastic bag is an easy substitute for a pastry bag. Fill the bag and snip off about 1/2-3/4 inch of one corner and you are set to go. No fancy piping tips but it gets the mousse in the containers quickly and cleanly.


ADD TOPPINGS OR LAYERS 

Top with whipped cream

I usually double the recipe for Mascarpone Whipped Cream to serve on top of the mousse. Once whipped and piled onto the mousse, the cream holds up even over several days.


Garnish with chocolate shards or shavings

Chocolate shards make for a jaunty topping. Chocolate shavings (use a vegetable peeler and a bar of chocolate) are fine, too, but if you want to learn the fun technique for making chocolate shards, find the recipe in Baking Together #30.


Add fruit or nuts

Any type of fresh fruit – chopped into small pieces if necessary – can be scattered over the whipped cream (with or without the shards) just before serving. Consider strawberries, raspberries, pitted cherries, peaches or even orange segments (also called supremes). Pomegranate seeds add a splash of holiday color, too. Feel free to top with a few sliced almonds or chopped hazelnuts for a crunchy texture.


Layer the mousse, parfait-style

Crisp cookies like cinnamon grahams or chocolate or vanilla, or even peppermint Girl Scout cookies, can be used in between layers of the mousse. I prefer to crush them into small or fine bits. The layered mousse can and should still be made ahead, but much like an old-fashioned ice box cake, the cookies will soften into a cake-like texture (Yum!).


CHANGE UP THE FLAVOR

Orange

Add finely grated orange zest to the melted chocolate mixture and substitute orange flavored liqueur in place of the bourbon or vanilla extract. Consider sprinkling a little orange zest over the whipped cream (with or without the shards) just before serving.


Coffee

Add 1/2 teaspoon instant espresso or coffee powder to the chocolate and cream mixture before heating and substitute coffee liqueur in place of the bourbon or vanilla extract. Consider sprinkling some crushed chocolate covered espresso beans over the whipped cream (with or without the shards) just before serving.


Peppermint

Add a hint of pure peppermint extract to the chocolate mixture along with the bourbon or vanilla extract. Consider sprinkling some crushed peppermint candies over the whipped cream (with or without the shards) just before serving.

Tuesday, November 29, 2022

Red Lentil and Carrot Curry


Author: Brittany Dixon for A Healthy Slice of Life

This nourishing curry recipe is perfect for when you need something comforting and delicious on the dinner table quickly!

Ingredients

  • 3 Tbsp olive oil
  • 3 garlic cloves, minced
  • 1.5 tsp grated ginger
  • 1 small onion, small diced (about 1 cup)
  • 2 large carrots, small diced (about 1 cup)
  • 1.5 Tbsp curry powder
  • 1 tsp turmeric
  • 1.5 cups red lentils
  • 1.5 tsp salt
  • 1 cup vegetable broth
  • 1 can full fat coconut milk
  • 3 oz chopped baby spinach
  • Juice of half a lime

Directions

  • In a large pan, heat oil over medium heat.
  • Add onion and carrots. Sauté 4 minutes until onions are beginning to soften. Add garlic, ginger, curry powder, and turmeric to the pan and sauté for 1-2 minutes more, until fragrant.
  • Add lentils, salt, broth, and coconut milk to the pan. Bring to a boil while mixing well, then cover and reduce heat to a gentle simmer. Let simmer for 20 minutes, then remove from heat.
  • Take off the lid, add spinach and lime juice and stir to combine. Serve over hot buttered rice.

Notes

If you’d like a thinner consistency, slowly add 1/2-1 cup more of vegetable broth as the curry simmers, stirring well, until it reaches your desired consistency. Adjust seasoning as needed and enjoy as a soup!

Wednesday, September 28, 2022

Bourbon Hot Toddy (Martha Stewart)


https://www.marthastewart.com/1530837/bourbon-hot-toddy

Ingredients:

  • 2 oz water
  • 2 tsp honey
  • The juice of 1/4 fresh lemon
  • 2 whole cloves
  • 2 oz bourbon
  • 1/2 oz orange liqueur (Patron)
  • 1 cinnamon stick
  • Thin lemon wedge and dried orange peel for garnish

Directions:

  • Heat the water in a pan.  (Heat but don't bring to a boil.)  
  • Remove from heat, and stir in the honey and lemon juice.
  • When thoroughly mixed, add 2 cloves and a small pinch of cinnamon
  • Let sit for 5 minutes.
  • Stir mixture and combine in glass with:
    • Half an ounce of orange liqueur
    • Add 2 oz of bourbon to a glass. 

Tuesday, September 20, 2022

Bahama Mama

This recipe came from Anne Palmer.

ingredients
1 oz rum
1 oz toasted coconut rum
2 oz pineapple juice
2 oz orange juice
Quarter of an ounce grenadine

Directions
Add ingredients, in order, to an ice-filled glass. Garnish with orange and/or lime slices

Alternative recipe, from delish:

Ingredients
Two parts orange juice
One part pineapple juice
One part dark rum
1/2-part coconut rum
1/2 part lime juice
Splash of grenadine
Pineapple wedges for garnish
Maraschino cherries for garnish

Directions:
Fill a glass with ice. Pour over orange juice, pineapple juice, dark rum, coconut rum, lime juice and grenadine.
Garnish with pineapple and maraschino cherries.

Wednesday, July 13, 2022

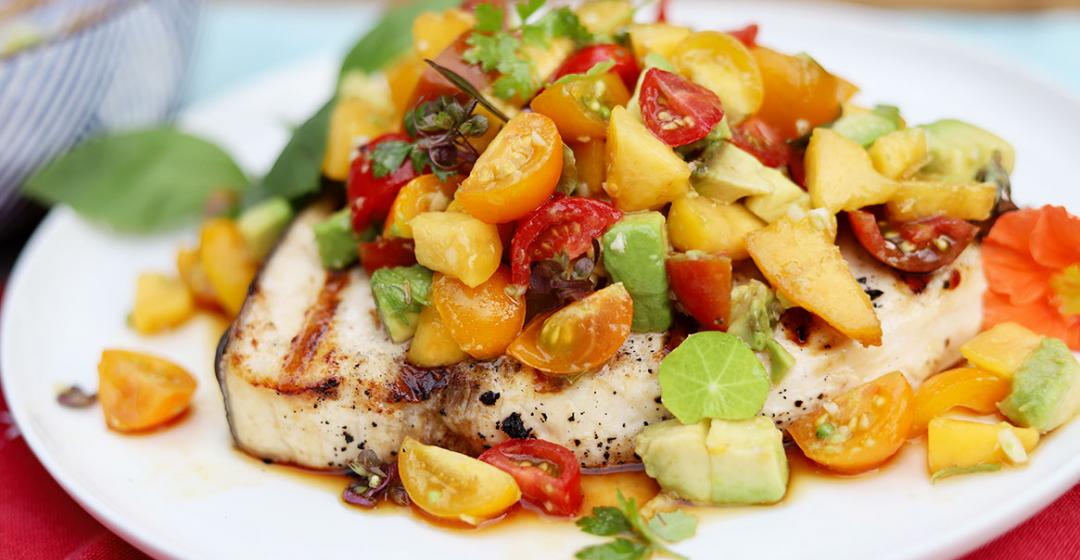
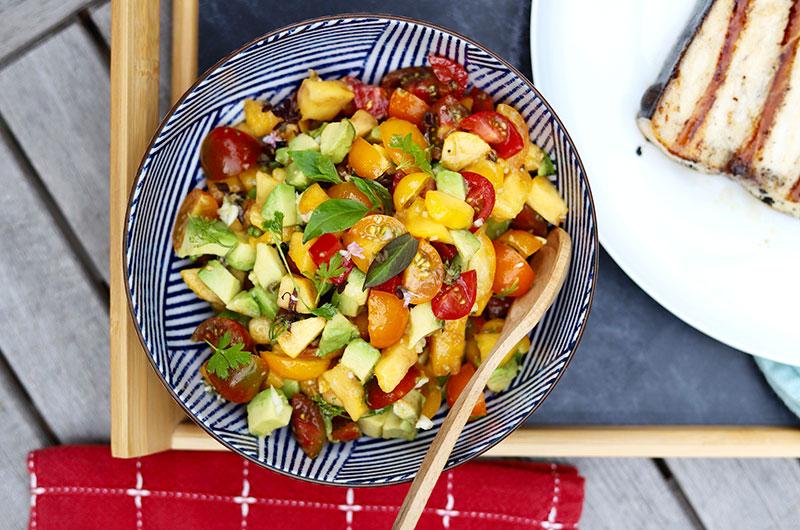
Grilled Swordfish with Tomato-Peach Salsa Salad

 Fresh fish, fresh tomatoes, fresh peaches — Vineyard summer perfection.

BY SUSIE MIDDLETON, Cook the Vineyard

https://mvmagazine.com/news/2020/07/27/grilled-swordfish-tomato-peach-salsa-salad

This simple recipe was inspired by two things – a great piece of swordfish from The Net Result and some wonderful peaches. I grabbed the recipe for my Tomato Peach Bruschetta topping and noodled it a bit to make a great accompaniment to the swordfish. A classic New England trick for grilling swordfish is to coat it first with mayonnaise, which will keep it moist.

A one-pound filet of swordfish is only enough for two in our household, but if you generally eat smaller portions of protein, you could feed three with about 1¼ pounds, and you’ll still have plenty of the topping to go around. For a party of six, just double everything.

Serves 2 or 3

Ingredients:

  • For the salsa:
    • 1 cup diced, cored ripe summer tomatoes, any size
    • 1 cup diced pitted firm-ripe peaches or nectarines 
    • 1 small avocado, diced (optional, about 2/3 cup)
    • 2 teaspoons minced fresh ginger (optional)
    • 1 clove garlic, peeled and minced

  • For the swordfish:
    • 10 to 12 leaves basil (or basil and mint) sliced or chopped or 20 to 30 small whole leaves
    • 1 tablespoon extra-virgin olive oil
    • 2 teaspoons fresh lemon juice
    • 1 teaspoon white balsamic vinegar
    • 1 teaspoon maple syrup
    • Kosher salt

  • 1  to 1 ¼ pounds (1 1/4-inch thick) swordfish filet, cut into 2 or 3 pieces if desired
  • freshly ground pepper
  • 2 tablespoons mayonnaise

Directions

  1. Heat a gas grill over medium-high heat.
  2. In a small mixing bowl, combine the tomatoes, peaches or nectarines, avocado (if using), garlic, and ginger (if using)
  3. In another small bowl, combine the olive oil, lemon juice, balsamic vinegar, maple syrup and about 1/4 teaspoon kosher salt. Whisk to combine.
  4. Add the dressing and most of the herbs to the tomato mixture and fold together. Add a pinch of salt and stir again. Let sit while cooking the swordfish.
  5. Season the swordfish on both sides with salt and pepper. Coat one side of the swordfish generously with half of the mayonnaise.
  6. Arrange the fish on the grill grates, mayonnaise side down. Before closing the grill, brush the top side with the remaining 1 tablespoon of mayonnaise. Cook for about 6 to 7 minutes (you should have nice grill marks) and carefully flip the fish over with a metal spatula. Cook for another 6 to 7 minutes, or until the swordfish is firm or cooked to your liking. 
  7. Remove the swordfish from the grill and arrange on a serving platter. Generously mound the tomato-peach mixture on top and garnish with the remaining herbs. Serve right away.
 

Wednesday, March 9, 2022

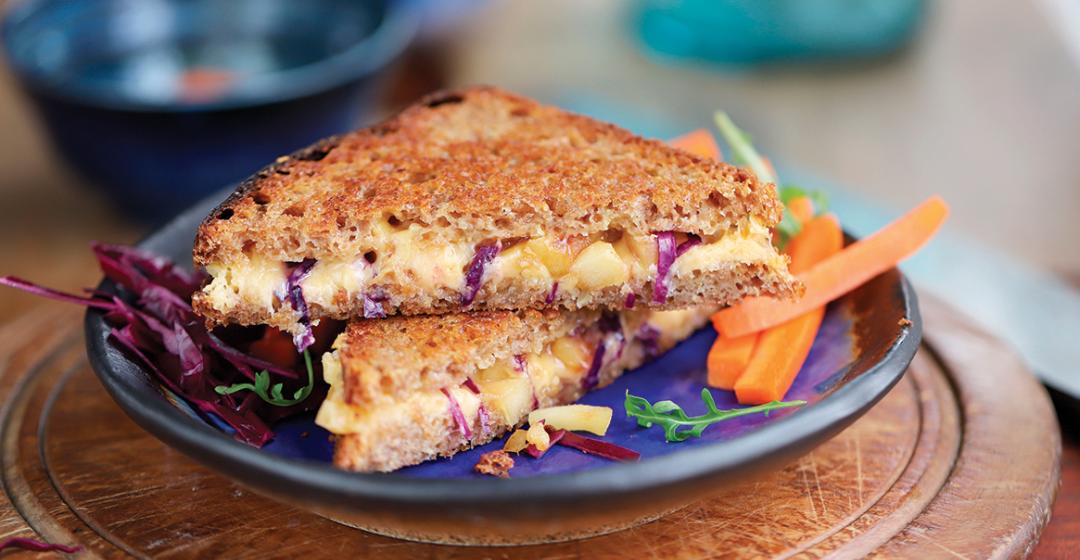
Grilled Cheese (Custom) with Vineyard Bread

From "Cook the Vineyard"

Cheese gets all the love, but truthfully the right bread is key to a good grilled cheese.

BY SUSIE MIDDLETON

Here’s a master recipe for a delicious grilled cheese that you can use as a template and vary as you like.

Cinnamon Starship’s einkorn bread with gouda and apple

Cheese gets all the love, but truthfully the right bread is key to a good grilled cheese. (Even better: locally made Artisan bread.) Anything floppy and full of preservatives is going to give you a sad grilled cheese. What you’re looking for is firm structure (a few airy holes are bonus pockets for melting cheese and butter) and robust flavor (think multi-grains, sourdough wheat, or cheese bread – double the cheese!). Freshly baked Island artisan bread is ideal.

While cooking the perfect grilled cheese has a lot to do with getting to know your own stove and cookware, there are a few technique tips to 
follow. Years ago, I learned from Laura Werlin, author of six cheese books, to cover the pan for the first half of cooking – this assures that the cheese will 
be melting at about the same rate as 
the bottom is browning, provided you don’t crank up the heat too much. Then when you flip the sandwich, you want 
to leave the cover off so that trapped moisture doesn’t soften that nicely crisped topside. So choose a skillet 
(I like my nonstick straight-sided 10-inch pan) with a cover to make grilled cheese. No cover? Improvise with a sheet pan.

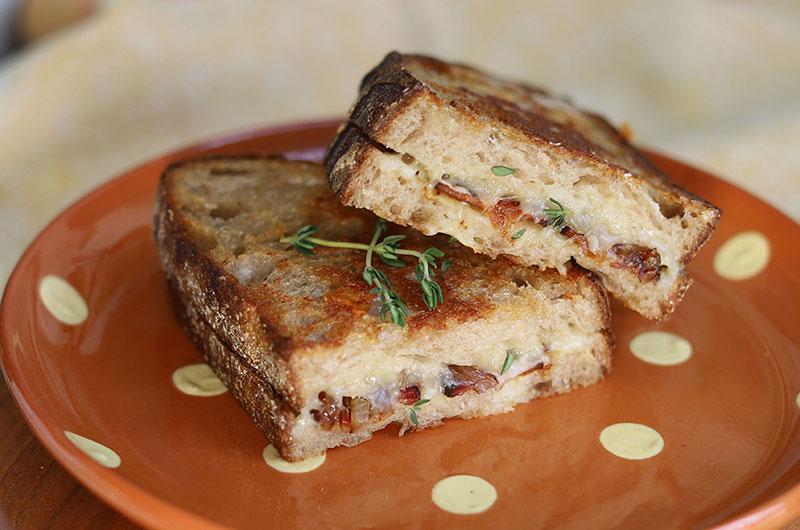
Grey Barn’s wheat bread with cheddar, bacon, and shallots makes a great grilled cheese.

As far as cheese goes, I favor a sharp cheddar or an aged gouda for their assertive flavor and because they soften but also hold their shape. If you like ooey-gooey, choose a younger cheddar or gouda (or even brie or camembert); you may have to adjust the heat up a bit to brown and crisp your bread before the cheese melts too much. I’ve also given you choices for additional ingredients to layer into your sandwich. Just keep a light hand with those add-ins – you can skip them altogether if you’re a purist. And don’t forget a sprinkling of sea salt; it really makes the sandwich.


Makes 1 sandwich

Ingredients

  •  2 slices (of equal size) firm-textured artisan bread 
(ideally Vineyard made), about ½-inch thick each
  •  About 2 ounces sharp cheddar, young 
or aged gouda, gruyère, Jarlsberg, or Monterey Jack cheese
  •  Unsalted butter, softened
  •  Dijon mustard, honey mustard, or pesto (optional)
  •  Sea salt
  •  Add-ins (optional, choose one or two): 2 tablespoons sautéed sliced shallots, sautéed diced apples, or sautéed diced mushrooms; 1 tablespoon finely sliced red or Napa cabbage (quick-pickled or briefly sautéed), finely chopped kimchi or other pickles; 1 tablespoon minced sundried tomatoes or minced roasted peppers
  •  1/4 to ½ teaspoon fresh thyme leaves, sliced fresh chives, or other fresh, 
tender herb
  •  2 thick-cut slices applewood smoked bacon (cooked) or 2 to 3 thin slices 
salami, sliced into strips and sautéed until crisp (optional)

 Directions:

1. Arrange all of your ingredients on your countertop. Put your bread slices on a cutting board or other work surface. Slice your cheese so that you (ideally) have enough to completely cover one piece of bread and have a few thin slices leftover (which you will use at the end of assembly).

2. Spread softened butter (about 1 teaspoon) generously over one piece of the bread. Sprinkle sea salt over the butter. Turn that piece over and spread the other side lightly with Dijon, honey mustard, or pesto if you like. Do not spread anything on the other piece!

3. Put another 1½ to 2 teaspoons butter in a skillet (that has a lid) on the stovetop. Turn the heat to medium-low. When the butter has melted, sprinkle a little sea salt over it.

4. Meanwhile, assemble the sandwich starting with the unbuttered slice of bread. Cover the slice with cheese, sprinkle add-ins and herbs across the cheese judiciously, and top with bacon or crisped salami, if using. Finally, top with a few very thin slices of cheese. Cover with the buttered slice of bread (butter side up) and transfer the whole sandwich to the warm pan, centering in the pool of melted butter. Turn the heat up just a notch to a lowish-medium (between medium-low and medium, depending on your stove) and cover the pan.

5. Cook, covered, for about 3 minutes, or until the bottom side is golden brown and you can see that the cheese has begun to melt. Don’t walk away. Check with a spatula after a couple of minutes if you think the pan is too hot (you might smell or hear the browning picking up) or not hot enough, and adjust the heat if necessary. Err on the side of less heat, especially when using firm cheese. A little longer in the pan won’t hurt. But do get that good bread nice and crisp.

6. Uncover, flip carefully, and continue 
to cook about 3 minutes more until the bottom side is nicely browned and crisp and the cheese is beginning to drip down the sides of the bread. Remove from the pan, let cool a few minutes, slice in half, and serve.

Sunday, March 6, 2022


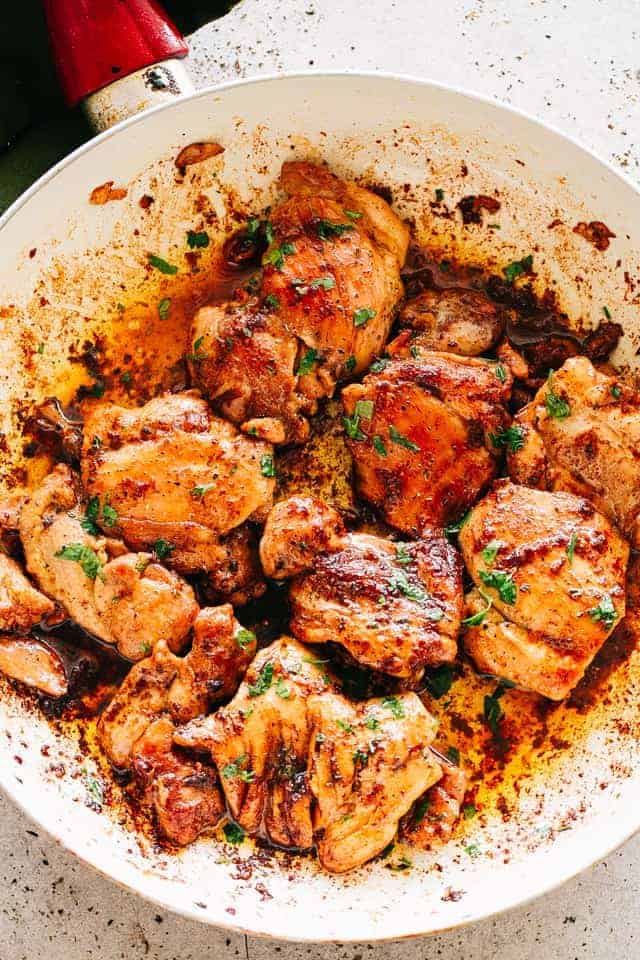
Juicy Stove Top Chicken Thighs


Prep Time5 mins
Cook Time15 mins
Total Time20 mins
Perfectly golden, tender, and juicy skinless, boneless chicken thighs prepared on the stovetop.
Course: Dinner
Cuisine: American
Servings: 4 serves
Calories: 283
Author: Katerina | Diethood


Ingredients

  • 1 1/2 tablespoons olive oil
  • 1.5 pounds (about 6 chicken thighs) boneless skinless chicken thighs (you can also use chicken breasts)
  • 1/2 teaspoon onion powder
  • 1/2 teaspoon garlic powder
  • 1/2 teaspoon chili powder
  • salt and fresh ground pepper, to taste
  • 1 tablespoon butter
  • 2 cloves garlic, minced
  • 1/2 cup low sodium chicken broth (you can also use wine or juice)
  • fresh chopped parsley for garnish

Instructions 

  • Season chicken thighs with onion powder, garlic powder, chili powder, salt, and pepper.
  • Heat oil in a large skillet over medium heat.
  • Add seasoned chicken thighs to the skillet, smooth side down; cook for 5 minutes or until you can easily flip over the chicken. Flip and continue to cook for 6 to 7 more minutes, or until no longer pink.
  • Add butter and minced garlic; cook for about 30 seconds or until fragrant.
  • Add chicken broth and stir around to scrape up all the crispy bits on the bottom of the pan. Continue to cook for 1 minute.
  • Remove from heat. Garnish with fresh chopped parsley. Serve.

Notes

COOK’S NOTES FOR STOVE TOP CHICKEN THIGHS

  • Use a large skillet that comfortably fits 4 to 6 boneless, skinless chicken thighs.
  • Cook the chicken thighs over medium-high heat.
  • DO NOT move the chicken thighs around; let cook for 5 minutes or until you can easily flip them over.
  • After adding in the butter and garlic, a splash of chicken broth will help with scraping up all the bits on the bottom of the pan. If you want, you can also use your favorite white wine or apple juice.
  • Additionally, you can use chicken breasts in place of the chicken thighs.


WW FREESTYLE SMART POINTS: 6

Nutrition Facts
Juicy Stove Top Chicken Thighs
Amount Per Serving (4 ounces)
Calories 283Calories from Fat 135
% Daily Value*
Fat 15g23%
Saturated Fat 4g20%
Cholesterol 169mg56%
Sodium 190mg8%
Potassium 442mg13%
Carbohydrates 1g0%
Fiber 0g0%
Sugar 0g0%
Protein 33g66%
Vitamin A 200IU4%
Vitamin C 0.5mg1%
Calcium 18mg2%
Iron 1.4mg8%
* Percent Daily Values are based on a 2000 calorie diet.
Keywords: chicken dinner recipe, chicken thighs recipe, stove top chicken

Monday, February 21, 2022

Cosmopolitan


Ingredients

  • 2 ounces vodka
  • 1 ounce cranberry juice cocktail
  • ¾ ounce fresh lime juice
  • ¾ ounce triple sec
  • Orange twist (for serving)

Preparation

Step 1

Combine vodka, cranberry juice, lime juice, and triple sec in a cocktail shaker. Fill shaker with ice, cover, and shake vigorously until outside of shaker is very cold, about 20 seconds.

Step 2

Strain cocktail through a Hawthorne strainer or a slotted spoon into a martini glass. Garnish with orange twist.

Monday, February 14, 2022

The Daily Paper Power Salad


Baby kale, slaw, quinoa, avocado, apple, cucumbers, hard boiled egg and sunflower seeds with Apple Vinaigrette Dressing 


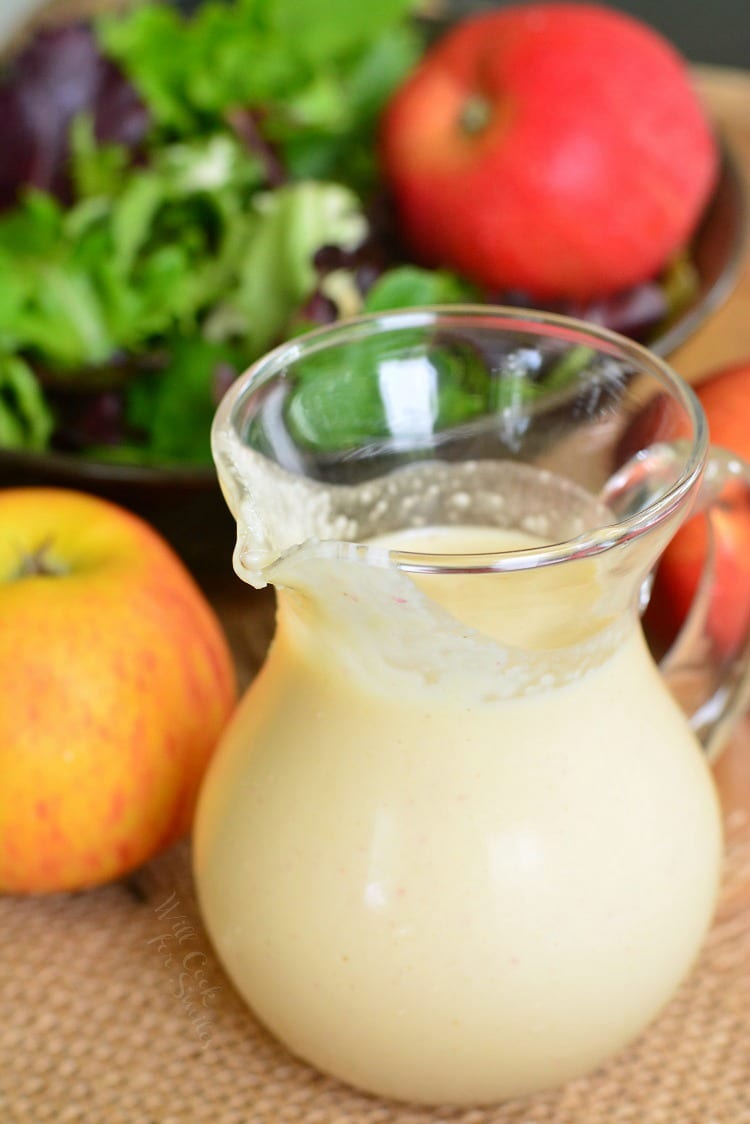
Apple Vinaigrette Salad Dressing

Apple Vinaigrette Dressing


Tasty and ready homemade Apple Vinaigrette salad dressing is a perfect sweet and tangy dressing for summer salads. The process for making this dressing is as simple as combining the ingredients in the blender and pulsing it until the dressing is smooth.

Ingredients

  • 5 oz red apple (gala, pink lady, McIntosh, or any other sweeter apple)
  • 2 oz shallot (1 medium shallot)
  • 1 1/2 tbsp brown sugar
  • 1 tbsp Dijon mustard
  • 1/4 cup white wine vinegar
  • 2 tbsp apple juice
  • 3/4 cup olive oil
  • 1 tbsp lemon juice
  • Dash of salt

Substitutions

  • If you do not have a shallot on hand, you can substitute another onion.
  • Brown sugar can be substituted by honey if you wish.
  • White wine vinegar can be substituted by white balsamic or apple vinegar.

Instructions

  • Peel and core the apple. Peel the onion. Chop both onion and apple for easier blending. 
  • Add all ingredients in a blender and pulse until the dressing is all blended and smooth.
  • Refrigerate in a glass, air-tight container.
  • (Generally a vinaigrette can be kept in the refrigerator for up to 2 weeks but I use it within 7-10 days to be safe.)


Sunday, February 6, 2022

Whiskey Sour


Spirit, citrus and sugar—the original big three—combine to form the classic sour, one of the oldest types of cocktails. The category includes the Whiskey Sour, which has sated thirsty drinkers for more than one and a half centuries. It’s unknown exactly when the cocktail was conceived (or who was the architect), but its history stretches back to the Lincoln administration, and the first printed recipe appeared circa 1862 in the famed “Jerry Thomas Bartenders Guide.”

The Whiskey Sour was traditionally made with whiskey, lemon juice, sugar and egg white, an ingredient that tames the tart flavor and creates a richer, smoother texture. Today that egg is optional, and it’s common to find bars serving Whiskey Sours without egg white. But if you want to taste the original incarnation of the drink, and put a little protein in your system, give it a try. When using egg white, you’ll want to perform a “dry shake” and shake all the ingredients without ice before shaking again with fresh ice. This pro move incorporates the ingredients together into one cohesive package.

Few drinks in the cocktail canon are as quick to satisfy as a silky sour. But like most classic cocktails, the Whiskey Sour has spawned countless variations, from tried-and-true riffs like the red wine-topped New York Sour to versions incorporating other fruits, juices and sweeteners. Add a flourish to any component, and you have a personal spin on this classic refreshment.

We like our Whiskey Sour spiked with bourbon, thickened with egg white and topped with a few dashes of aromatic bitters for a complementary spice note. Follow that format, and you can’t go wrong. But one of the best things about the sour is that it’s customizable, so you do you.

Ingredients

  • 2 ounces bourbon
  • 3/4 ounce lemon juice, freshly squeezed
  • 1/2 ounce simple syrup
  • 1/2 ounce egg white (optional)
  • Garnish: Angostura bitters

Steps

  • Add bourbon, lemon juice, simple syrup and egg white, if using, to a shaker and dry-shake for 30 seconds without ice.
  • Add ice and shake again until well-chilled.
  • Strain into a coupe glass.
  • Garnish with 3 or 4 drops of Angostura bitters.