Use the printer friendly button

Use the "printer friendly" button when printing a recipe.

Friday, July 31, 2020

Stir-Fried Chicken and Bok Choy


YIELD     Serves 2 to 3
TIME       30 minutes

Evan Sung for The New York Times


No need for a wok here. You can use a flat-bottomed skillet or sauté pan instead, the bigger the better. You want as much surface area as possible to get as hot as possible, so preheat the pan for at least five minutes before adding the oil. There should be a forbidding amount of smoke when the ingredients hit the pan (open the windows and turn on the fan before you start). That will give you the deepest sear. Stir-fries are infinitely variable, and you can change up this recipe by using beef or pork, and other green vegetables (asparagus, broccoli, mustard greens, cabbage, spinach or thinly sliced green beans) substitute nicely for the bok choy. Make a version of this dish once or twice and you’ll have a reliable and delicious alternative to takeout.

Featured in: The Ease Of Stir Fry. 

INGREDIENTS

  • 2 tablespoons soy sauce
  • 2 tablespoons rice wine vinegar
  • 1 ½ tablespoons sesame oil
  • 2 teaspoons light brown sugar
  • ¾ pound boneless chicken thighs, cut into 1/2-inch strips
  • 2 tablespoons finely chopped gingerroot
  • 2 cloves garlic, finely chopped
  • 3 tablespoons peanut or vegetable oil
  • ½ pound bok choy (1 head), trimmed and thinly sliced
  • 2 leeks (1/2 pound), halved lengthwise and thinly sliced
  •  Pinch chile flakes
  •  Salt, as needed
  •  Cooked rice, for serving

PREPARATION

In a medium bowl, whisk together soy sauce, vinegar, sesame oil, and sugar. Pour half the mixture over the chicken, along with half the ginger and half the garlic. Let stand 20 minutes.

Heat a large, 12-inch skillet over high heat until extremely hot, about 5 minutes. Add 1 tablespoon peanut oil and the chicken. Cook, stirring constantly, until meat is cooked through, about 3 minutes. Transfer to a plate.

Add the remaining peanut oil to the skillet. Add the bok choy and cook 1 minute. Stir in the leeks and chili flakes; cook, tossing frequently until bok choy and leeks are tender, about 1 minute. Stir in the marinade and a pinch of salt. Move vegetable mixture to the border of the pan. Add remaining ginger and garlic to center of pan and cook, mashing lightly, until fragrant, about 30 seconds. Return chicken to skillet and combine with ginger, garlic, and vegetables. Serve immediately, over rice.

Sunday, July 19, 2020

Barbecued Chicken Thighs

Total:    4 hrs 30 mins
Prep:     4 hrs
Cook:    30 mins
Yield:    4 to 6 servings

Ingredients

3 lbs./1 1/2 kg. chicken thighs

For the Marinade

1/2 cup/120 mL. olive oil
3 tbsp./45 mL. white vinegar
1 tbsp. salt
1 tbsp. white sugar
1 tsp. red pepper flakes
2 tsp. sea salt

For the Barbecue Sauce

1 cup/240 mL. ketchup
1/4 cup/60 mL. white vinegar
1/4 cup/55 g. packed brown sugar
2 tbsp. sweet paprika
1 tbsp./15 mL. olive oil
1 tbsp. chili powder
1 tsp. garlic powder
Optional: 1 tsp. cayenne pepper
1/2 tsp. sea salt

Steps to Make It

Note: while there are multiple steps to this recipe, these bbq chicken thighs are broken down into workable categories to help you better plan for cooking.

Make the Marinade

Gather the ingredients.

Pat the chicken thighs dry with a paper towel.

In a large bowl, whisk together 1/2 cup olive oil, 3 tablespoons white vinegar, 1 tablespoon salt, white sugar, red pepper flakes, and 2 teaspoons sea salt.

Place chicken thighs in a resealable plastic bag.

Pour marinade over top, seal bag, and turn to coat. Refrigerate for two to six hours.

Make the Barbecue Sauce

Gather the ingredients.

Prepare the sauce by combining ketchup, 1/4 cup white vinegar, brown sugar, sweet paprika, 1 tablespoon olive oil, chili powder, garlic powder, optional cayenne pepper, and 1/2 teaspoon sea salt in a saucepan.

Simmer over low heat for 15 minutes stirring occasionally.

Remove sauce from heat and allow to cool for 10 minutes and then cover and set aside. If making the sauce a day in advance, cool completely and store in an airtight container in the refrigerator. Bring the sauce back to room temperature before finishing the recipe, but do not boil or overheat it.

Grill the Chicken

Heat a grill over medium-low heat (about 300 F/150 C).

Remove chicken from marinade, discard remaining marinade, and place chicken thighs on heated grill.

Cook for about 30 minutes with the lid down, turning occasionally.

As the chicken nears doneness, begin brushing sauce over the surface every 5 minutes until chicken is done and the sauce has cooked down to a sticky consistency. Remember, chicken is done when the meat has reached an internal temperature of 165 F/74 C. Make sure to test more than one piece for consistency.

Once cooked through, remove from heat and place onto a large platter. Tent with aluminum foil and let rest for 10 minutes.  

Serve with your favorite sides.  

Wednesday, July 1, 2020

Stir-Fried Beef and Bok Choy with Ginger

Winter produces the crispest, crunchiest cabbages of the year, and bok choy is no exception. Pair it with thinly sliced flank steak, and season with a few simple but bold seasonings. Serve this quick and hearty stir-fry with wide rice noodles or steamed brown rice, if you like.


Ingredients:
2 Tbs. dry sherry
1 Tbs. soy sauce
1/2 tsp. Asian chile paste
1 lb. (500 g) baby bok choy
2 tsp. peanut oil
2 garlic cloves, minced
1 Tbs. grated peeled fresh ginger
1 lb. (500 g) flank steak, thinly sliced across the grain

Directions:
In a small bowl, stir together the sherry, soy sauce and chile paste. Cut the bok choy lengthwise into halves or quarters, depending on size.

In a wok or a large fry pan over high heat, warm 1 1/2 tsp. of the oil. Add the bok choy and stir-fry just until crisp-tender, 3 to 4 minutes. Transfer to a bowl.

Warm the remaining 1/2 tsp. oil in the wok. Add the garlic and ginger and stir-fry until fragrant but not browned, 15 to 30 seconds. Add the beef and cook, stirring, just until no longer pink, about 2 minutes.

Return the bok choy to the wok, add the sherry mixture and cook until heated through, about 1 minute. Serve immediately. Serves 4.


Adapted from Williams-Sonoma One Pot of the Day, by Kate McMillan (Weldon Owen, 2012).

Monday, May 27, 2019

Lemon Herb Couscous Salad


PREP 10mins COOK 10mins TOTAL 20mins           Makes approximately 8 (1 cup) servings

We love this light couscous salad — it doubles as a side, can be the main event or works well topped with grilled chicken or shrimp! With lots of texture from crisp cucumber, sweet tomatoes, crunchy nuts, and raisins, this is certainly one of our favorites. You can even make it ahead of time.  

YOU WILL NEED
·         1 1/2 cups dried Israeli couscous, also called pearl couscous
·         Salt and fresh ground black pepper
·         1/4 cup extra-virgin olive oil
·         1 teaspoon Dijon mustard
·         1/2 teaspoon honey
·         1 teaspoon finely grated lemon zest
·         2 to 4 tablespoons fresh squeezed lemon juice, depending on taste
·         1 medium English cucumber, diced
·         1 large tomato, diced
·         1/2 cup coarsely chopped fresh herbs; use any combination of fresh parsley, cilantro, basil, dill, or mint
·         1/4 cup chopped walnuts, toasted
·         1/4 cup raisins, we love golden raisins

DIRECTIONS
Bring a large saucepan of salted water to a boil. Add couscous and cook until tender, 8-10 minutes. Drain.

While the couscous cooks, in a large bowl, whisk the oil, mustard, honey, lemon zest, lemon juice, 1/2 teaspoon of salt, and 1/4 teaspoon pepper. Add the drained couscous to the dressing and mix well.

Stir in the cucumber, tomato, herbs, walnuts and raisins. Taste for seasoning and adjust with salt and/or pepper as needed. Enjoy warm or cover then refrigerate until cool, about 1 hour.

ADAM AND JOANNE'S TIPS
·         If you cannot find Israeli Couscous, you may substitute with a small pasta shape such as orzo or use regular couscous.
·         To toast walnuts, add to a dry pan over medium heat. Cook, stirring frequently until the nuts turn golden brown and become fragrant, 5 to 10 minutes.
·         Make-Ahead: This salad is delicious when eaten straight away, but you can also make the salad, cover it and refrigerate for up to 4 hours. This way all the flavors marry and mingle, making for an even more delicious salad. If you are planning to make a day or two ahead of time, keep the tomatoes and walnuts separate until you’re ready to serve. This way they will remain crisp.

NUTRITION PER SERVING: Serving Size 1 cup / Calories 219 / Protein 5 g / Carbohydrate 29 g / Dietary Fiber 2 g / Total Sugars 4 g / Total Fat 9 g / Saturated Fat 1 g / Cholesterol 0 mg / Sodium 160 mg

Friday, January 18, 2019

Santa Maria-Style Pot Roast

Scotch Winter Warmer Cocktail

Combine in a mixing glass over ice:

  • 1 1/2 oz scotch
  • 3/4 oz sweet vermouth
  • 3/4 oz salted maple syrup*

Strain into lowball glasses over ice.  Garnish with a sprig of fresh rosemary.

* salted maple syrup: combine 2 oz maple syrup with 2 oz hot water and a dash of sea salt.


Saturday, January 5, 2019

Garlicky Kale and Bacon Pizza


Kale, meet bacon. Bacon, meet kale. Now that everyone has been introduced, I can let you in on a little secret. Those crispy kale chips piled on the pizza dough up above are tossed in bacon fat. I repeat: bacon fat. It all happened so quickly. There was kale. And there was leftover bacon grease.  
PREP 20 MINUTES      |     COOK 15 MINUTES     |     YIELD 6 SERVINGS

Ingredients
  • 1 pound store-bought or homemade pizza dough
  • Cornmeal, for dusting baking sheet
  • 4 slices thick-cut bacon, cut into 1/4-inch pieces
  • 2 1/2 cups curly kale leaves, torn into 1-inch pieces
  • 2 teaspoons olive oil
  • 2 cloves garlic, minced
  • 6 ounces mozzarella, thinly sliced
  • 1/3 cup thinly sliced red onions
  • Shredded Parmesan cheese, for garnish

Instructions

  1. Preheat the oven to 500ºF.
  2. Roll out the pizza dough on a lightly floured surface until it is roughly 12 inches wide and 1/4-inch thick. (See Kelly's Notes.)
  3. Invert a baking sheet and sprinkle it liberally with cornmeal. Transfer the dough to the baking sheet.
  4. Cook the diced bacon in a medium sauté pan set over medium-low heat until a majority of the fat has rendered. Remove the bacon pieces with a slotted spoon to a large bowl, along with 2 teaspoons of the bacon drippings. Add the kale, olive oil and garlic to the bowl, tossing to combine.
  5. Arrange the mozzarella slices in a single layer on the pizza dough, leaving a 1/2-inch border around the edges. Evenly scatter the kale-bacon mixture on top of the cheese then top the kale with the sliced red onions. Brush the border of the pizza dough with the reserved bacon drippings.
  6. Bake the pizza for 10 to 12 minutes, rotating it half-way through, until the crust is fully baked and golden brown. Remove the pizza from the oven to a cutting board, sprinkle it with Parmesan cheese, and slice and serve.

Kelly's Notes:

  1. The pizza dough can be rolled into any desired shape, including round, rectangular or free-form, for a more rustic look.
  2. You can use a pizza stone in place of the inverted baking sheet.
  3. Oven temperatures and positions may vary, so make sure you are baking your pizza on the middle rack and check it frequently.
  4. The kale leaves must be well coated in the bacon drippings and olive oil or they will burn before the dough is fully baked. And it may seem like a large amount of kale, but pile it high atop the dough, as it'll cook down significantly once baked.

Garlicky Kale and Bacon Pizza from justataste.com #recipe


Saturday, October 6, 2018

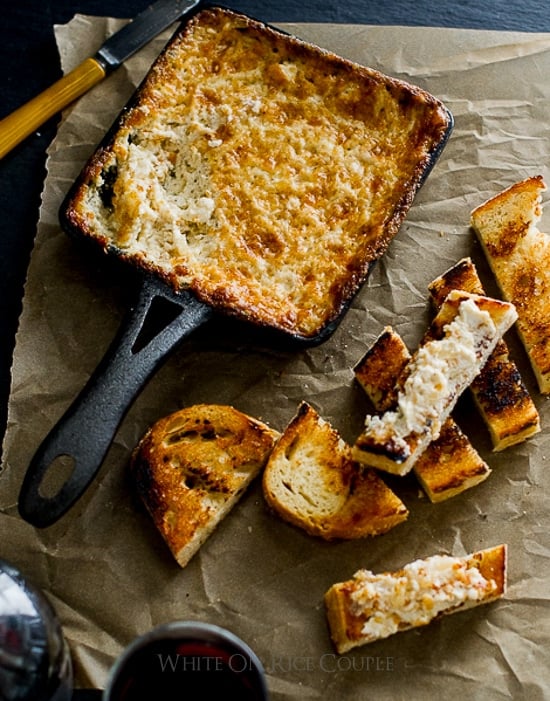
Sweet Onion Dip ("Crack Dip")

SWEET ONION DIP - AKA "CRACK DIP"


COURSE: DIPS

TOTAL TIME: 1 HOUR 15 MINUTES
 SERVINGS: 6 SERVINGS


Hot Sweet Onion Dip Recipe "Crack Dip" is an easy Hot Onion Dip Recipe for Game Day Dip Appetizers | @whiteonrice from WhiteOnRiceCouple.com

We first shared this recipe in 2008 and it's so popular that we wanted to also share it again in our cookbook, Bountiful. This dip was dubbed "crack dip" by friends who were over for an evening feast due to it's addictive nature. The name stuck and we've been calling that ever since. We've traditionally have served the dip with crackers or charred sliced of bread, however, with several friends needing gluten-free options, we've started serving it with crunchy vegetables such as radishes, jicama, celery, and carrots instead. We actually like the way the veggies help balance the richness of the dip better than that of the crackers or bread. It is also great to serve with heirloom tomatoes in the summertime. We'll also often make big batches, and then just dish out the un-baked dip into baking containers and then bake it whenever we need to serve it over a week or two span.
Mayo Substitution NOTE #1: Greek Yogurt is not a good substitution for mayo. There is a huge fat content difference between yogurt and mayo. Greek yogurt makes the dip dry. This dip is decadent and not meant to be healthy, so only possible substitution for mayo we can think of that might work is sour cream.
Oily Dip? Note #2: Each brand of mayo is different and some may result in an oily dip. We use Best Foods Brand, also similar to Hellmann's Mayo. Also, do not use more than 1 cup of mayo and don't pack it in the cup when measuring. Loosely fill the cup so you don't end up with too much. If you pack the mayo tightly in the measuring cup, it will be too much. Another reason for oily dip is because you're using the powdered parmesan cheese product in the green containers. Treat yourself to good freshly grated parmesean from the parmesan wedge and you will definitely taste a difference.

INGREDIENTS

  • 1 (8-ounce / 225-g) package cream cheese (at room temperature)
  • 1 cup (240ml) mayonnaise (preferably Best Foods brand)
  • 1 cup (100g) freshly grated Parmesan cheese (not the powdered cheese stuff in the green containers)
  • 1 cup (160g) diced sweet onion (sometimes we like to add extra 1/2 cup for more flavor and texture)
  • 2 teaspoons freshly cracked black pepper

DIRECTIONS

  1. Preheat the oven to 350°F (175°C).
  2. In a bowl, mix together the cream cheese, mayonnaise, Parmesan, onion, and black pepper and until everything is thoroughly combined.
  3. Pour the mixture into a 6-inch (15-cm) baking dish or any oven-safe dish. Bake for 50 minutes to one hour, till everything is melted together. When the top crust is brown and almost burnt-looking, the dip is ready. The darker brown the crust becomes, the better the flavors are.
  4. Serve with your favorite crusty bread, crackers, slices of tomatoes, or crunchy vegetables such as radishes, jicama, carrots, and celery.

Monday, September 3, 2018

Lemon drop martini

Lemon Drop Martini

https://www.geniuskitchen.com/recipe/lemon-drop-martini-88364


INGREDIENTSNutrition

DIRECTIONS

  1. Chill martini glasses in freezer for at least 10 minutes prior to serving.
  2. Place Vodka, Triple Sec, lemon juice and sugar into a cocktail shaker with 4-5 ice cubes and shake vigorously for 30 seconds.
  3. Run the lemon twist around the edge of the chilled martini glass and dunk in a small amount of sugar for a coated rim.
  4. Pour the strained martini into the chilled glasses and serve.

Thursday, July 26, 2018

Perfect Hard Boiled Eggs

From Martha Stewart

https://www.marthastewart.com/354061/perfect-hard-boiled-eggs

One Dozen Eggs

1.  Place eggs in a large saucepan. Cover them with cool water by 1 inch. Slowly bring water to a boil over medium heat; when the water has reached a boil, cover and remove from heat. Let sit 12 minutes.

2. Transfer eggs to a colander; place under cool running water to stop the cooking. Eggs can be peeled and served immediately.

Friday, March 23, 2018

72-hour pizza dough

From South Shore Living magazine, March 2018 issue, "Baking with Steel" article about Andris Langsdin, founder of The Baking Steel Company.

One of my favorite pizza dough recipes is Jim Lahey's no knead dough, on which this recipe is based. It's simple, doesn't require any equipment and doesn't make a big mess. (My wife disagrees about the mess I have a talent for covering the kitchen and flour.) I make this dough at least once a week, sometimes quintupling the recipe and saving the extra balls of dough to use later for the pizza classes I teach.

Through the years I have adapted Jim's original to make it my own. One change is that I use bread flour instead of all purpose flour, which adds the perfect heft to your crust when the dough is baked and high heat in a home environment. And somewhat ironically, I actually need the no knead dough. After I incorporate all the ingredients, I wet my hands and knead the batch for 2 to 3 minutes. Without this step I've ended up with dry clumps of flour in the dough. There are worse things in life, but we're seekers of pizza perfection.

This dough is simple and foolproof, but you do need time. Not hands-on or working time, but 24 hours for rising and then 48 hours for the cold for fermentation. That's 72 hours total, in case you don't have a calculator.

The first 24 hours allows the dough to bulk ferment (or rise as one unit) before being divided into individual dough portions at room temperature. Just park the dough someplace where it won't be disturbed. The dough will release a pleasant aroma that will make your kitchen smell like a bakery.
Next, you will portion out the dough, ball it up, and store the balls in the refrigerator for a minimum of one day and up to 10. This is when the dough will develop some kick ass flavor. The process is called cold fermentation, and it slows down the activity of the yeast to produce amazing flavors in your dough. The strike zone for the dough, in terms of optimal texture and flavor, is from day 3 through day 5 or 48 to 96 hours after the bulk fermentation that occurs in step 4 below. You can take the dough out of the fridge and make pizza earlier, but the full 72-hour method is what gives it a truly memorable taste and texture.

     This dough recipe makes four 10" pies, three 12" - 14" inch pies, or one 18" by 13" in Sicilian pie.
Ingredients
  • 500 grams (3 3/4 cups) bread flour 
  • 16 grams (1 tablespoon) fine sea salt 
  • 1 gram (1/4 teapoon) active dry yeast 
  • 1 1/2 cups water, at room temperature

  1. In a large bowl, whisk together the bread flour, salt, and yeast.
  2. Slowly add the water and mix with a wooden spoon just to combine. Once the mixture is moistened, lightly flour a counter top or large cutting board and remove the dough from the bowl with lightly oiled or wet hands to discourage sticking. Knead for 2 to 3 minutes to remove clumps; the dough won't become elastic but should easily form a loose ball.
  3. Place the dough in a lightly oiled bowl and cover with a damp, clean kitchen towel or plastic wrap to prevent it from drying out.  
  4. Place the bowl on the counter and lit it sit 24 hours at room temperature.  It will double in size and you may see bubbles forming on the surface.
  5. Lightly flour a large cutting board or your kitchen counter top and place the dough on it.  Wet or lightly oil your hands again.
  6. Divide dough into 4 equal portions for 10" pies, or 3 portions if you'r making slightly larger pies.  With wet or oiled hands, make each portion into a dough ball.
  7. Place the dough balls into oiled, cylindrical, airtight containers (deli takeaway containers are ideal), date them, and place in the fridge for 48 - 96 hours.
  8. Remove from refrigerator at least 1 hour before use to allow the dough to come to room temperature.  This lets the gluten relax and makes the dough malleable.

Monday, January 29, 2018

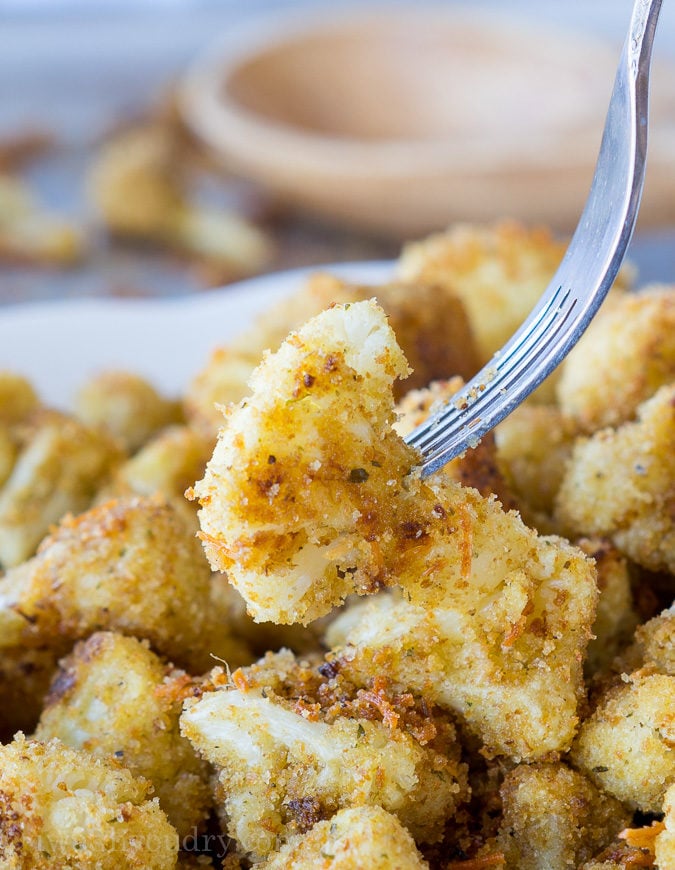
Parmesan Crusted Cauliflower

These Parmesan Roasted Cauliflower Bites are so easy to make and taste absolutely phenomenal. My whole family devoured the pan.

Parmesan Roasted Cauliflower

These Parmesan Roasted Cauliflower Bites are the perfect quick and easy side dish, or double as a vegetarian baked chicken nugget!

Ingredients


  • 7 cups cauliflower florets, cut to bite sized pieces
  • 3 to 4 tbsp olive oil
  • 1 cup Italian bread crumbs
  • 1/2 tsp garlic powder
  • 1/2 tsp salt
  • 1/3 cup parmesan cheese

Instructions

  • Preheat oven to 425 degrees F. Line a large, rimmed baking sheet with foil and spray liberally with non-stick cooking spray. Set aside.
  • Combine the cauliflower and olive oil in a large zip close bag and shake to coat.
  • Add the remaining ingredients to the bag and shake until coated, pressing slightly to help the breading stick. 
  • Pour onto the baking sheet and spray the tops of the cauliflower with cooking spray and bake for 20 minutes. 
  • Stir the cauliflower and continue to bake an a additional 10 minutes.  Serve hot.