Use the printer friendly button

Use the "printer friendly" button when printing a recipe.

Tuesday, December 27, 2022

Chile Relleno

An authentic chile relleno recipe made from roasted poblano peppers stuffed with cheese, dipped in a fluffy egg batter and fried until golden brown!

Prep Time: 30 mins;  Cook Time: 15 mins;  Total Time: 45 mins

Servings: 6 servings (1 chile each) Calories: 334

Author: Isabel Eats

Equipment

  • Toothpicks, for securing the stuffed peppers

Ingredients

  • For the chile rellenos
    • 6 large poblano peppers
    • 8 ounces Monterey Jack cheese, cut into long strips/sticks (or shredded cheese)
    • 4 cups oil, for frying
    • 3 large eggs
    • 1/2 cup all-purpose flour
    • 1/2 teaspoon table salt
  • For the salsa roja
    • 6 roma tomatoes, quartered
    • 1/2 small onion, halved (yellow or white)
    • 3 cloves garlic
    • 1 jalapeno, stem and seeds removed (optional)
    • 5 sprigs cilantro
    • 1 teaspoon coarse kosher salt, plus more to taste
    • 1 teaspoon olive oil

Instructions

For the chile rellenos

  1. Roast the peppers: Line a large baking sheet with aluminum foil and place poblano peppers on top. Set your oven rack directly underneath the broiler and turn the broiler on.
  2. Broil poblanos for 5 minutes, or until the skin is blackened and blistered. Carefully flip them over and broil for another 5 minutes, or until the skin is blackened and blistered.
  3. Remove them from the oven and loosely cover the baking sheet with aluminum foil or plastic wrap to keep in some of the heat and help them steam. Let them sit for 5 minutes.
  4. Peel the peppers: Peel and rub off as much of the loose skin on the peppers as possible. It doesn't have to be perfect, just as much as you can.
  5. Cut a small slit down the middle of the peppers with a knife. (If you don't want the peppers too spicy, you can remove some of the seeds. I like to leave them in as poblanos aren't typically super spicy to me, but that's personal preference.)
  6. Stuff the peppers: Carefully stuff the peppers with the cheese. Some of the peppers will be extra fragile because of the roasting process and may tear - that's okay. Just do the best you can.
  7. Gently close the opening of the peppers and secure it shut with 1-3 toothpicks. Use as many as you need to ensure that the cheese won't ooze out during the frying process. Set aside.
  8. Prepare for frying: Heat the oil frying oil in a large saucepan or deep skillet over medium-high heat. Line a baking sheet with paper towels and set aside. While oil is heating up, prepare the batter.
  9. Make the batter: Separate the egg whites from the yolks into two separate bowls - the whites into a large mixing bowl and the yolks into a small bowl. Using an electric hand mixer, beat the egg whites until stiff peaks form.
  10. While continuing to beat the egg whites on low, add in the egg yolks one at a time until all of them are fully mixed in. The batter should be light, fluffy and smooth.
  11. Coat the peppers with batter: Place the flour and salt into a separate shallow bowl or plate. Mix together to combine. Gently roll the stuffed peppers in the flour mixture, then give them a gentle tap to remove any excess. Then dip them in the egg batter and gently place them in the hot frying oil.
  12. Fry the chile rellenos: Fry the peppers for 3-5 minutes per side, until the batter is golden brown and crispy. Try not to overcrowd the peppers in the pan - I usually fry 2 at a time depending on the pan I'm using.
  13. Transfer the peppers to the lined baking sheet to drain off any excess oil.

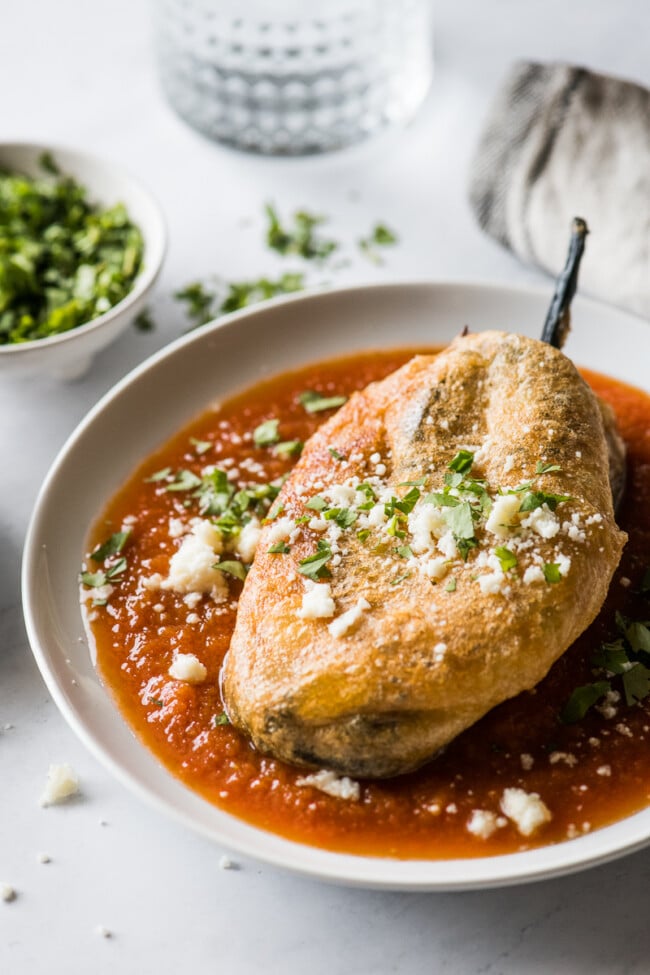
Serve: Immediately serve chile rellenos on a plate with some salsa, freshly chopped cilantro and some cotija cheese. (Don't forget to remove the toothpicks when you first cut into the peppers! You can try to remove them before serving onto plates, but I find it easier to remove them when you first cut into them.)

For the salsa roja

  1. Add tomatoes, onion, garlic, jalapeno, cilantro and salt to a blender. Puree until smooth.
  2. Heat olive oil in a small saucepan over medium-high heat. Add blended salsa and bring to a boil.
  3. Reduce heat to low and simmer, stirring occasionally for 8 minutes. Remove from heat, taste and season with more salt if desired.

Notes

Make ahead.  The poblanos can be roasted and peeled up to 2 days in advance. The salsa roja can be made up to 3 days in advance. Both should be kept in the fridge until ready to use.

Buy the largest poblano peppers you can find. That way you can stuff the peppers with a lot of filling and you won’t have any leftovers.

Use a different cheese. Feel free to use another type of cheese if that’s all you have. Traditionally, chile relleno is made with Oaxaca cheese, but you could also use mozzarella, cheddar, provolone or another good melting cheese.

Add a different filling. To make this a more well-rounded one-chile meal, feel free to mix in some other ingredients to the filling. Some good options would be carnitas, shredded chicken or picadillo.

Don’t overcrowd the frying pan. I typically fry two chile rellenos at a time even though the pan could fit three.

Nutrition:

Serving: 1pepper | Calories: 334kcal | Carbohydrates: 16g | Protein: 15g | Fat: 24g | Saturated Fat: 9g | Cholesterol: 127mg | Sodium: 635mg | Potassium: 523mg | Fiber: 4g | Sugar: 6g | Vitamin A: 1699IU | Vitamin C: 145mg | Calcium: 321mg | Iron: 2mg

Sunday, December 18, 2022

Velvety Chocolate Mousse


DECEMBER 12, 2022

BAKING Together Recipes

Velvety Chocolate Mousse

Elegant and easy, this is the make-ahead holiday dessert you've been looking for.

BY ABIGAIL JOHNSON DODGE


For this year’s holiday recipe for Cook the Vineyard, I’m sharing my easiest and most delicious chocolate mousse. No eggs involved here – just five ingredients. And the recipe can and should be made entirely ahead. Everything to love about that! I’ve also given you some fun topping ideas and flavor variations. For all my tips — and a recipe for chocolate shards — be sure to read Baking Together #30 before making the mousse. (Serving ideas are included in Kitchen Notes at the end of this recipe, too.)

Makes 4 servings

  • 1 2/3 cups (13 1/4 ounces) heavy cream
  • 6 ounces bittersweet chocolate, chopped
  • 4 tablespoons (2 ounces) unsalted butter, cut into 4 pieces
  • 2 teaspoons bourbon, other liqueur, or pure vanilla extract
  • Pinch of salt
  • Lightly sweetened whipped cream, chocolate shavings or shards or other toppings (see notes below) 


1. Put the heavy cream and chocolate in a medium, heatproof bowl. Microwave in 30 second bursts, stirring in between, until the cream is very hot and the chocolate is melted and the mixture is smooth. (This can also be done by setting the bowl over a pot of simmering water). Repeat the microwaving as needed if there are any stubborn chocolate bits. Add the butter pieces to the warm mixture and stir gently until the butter has melted. Stir in the bourbon (or other liqueur or vanilla) and salt.


2. Chill, stirring occasionally, until thick and very cold, about two hours or up to two days. (For faster cooling, set the bowl over a larger bowl filled with ice and a little water, stirring and scraping the sides frequently until very cold.)


3. Using an electric handheld mixer, beat the chilled mixture on medium-high speed until thick enough to hold medium-firm peaks on a spatula, 1 to 2 minutes, stopping occasionally to scrape down the sides of the bowl. (Note, if using a standing mixer, the whipping goes very fast – don’t walk away or you may overbeat the mixture. You want it to be creamy and somewhat stiff, but not grainy.)


4. Spoon or pipe the mousse into serving cups or small bowls. If serving right away, top with whipped cream and chocolate shavings or shards (if using) or other toppings. Or vary your presentation by layering with other ingredients. Alternatively you can cover the mousse cups (without topping) and refrigerate for up to two days.

KITCHEN NOTES

Double the recipe

Serving a larger crowd? Double or triple it up! Just remember to use a bigger bowl for the larger amount of ingredients and allow more time for chilling the chocolate mixture before whipping.


Pipe with a zip-top bag

If you want to pipe your mousse into cups, a zip-top plastic bag is an easy substitute for a pastry bag. Fill the bag and snip off about 1/2-3/4 inch of one corner and you are set to go. No fancy piping tips but it gets the mousse in the containers quickly and cleanly.


ADD TOPPINGS OR LAYERS 

Top with whipped cream

I usually double the recipe for Mascarpone Whipped Cream to serve on top of the mousse. Once whipped and piled onto the mousse, the cream holds up even over several days.


Garnish with chocolate shards or shavings

Chocolate shards make for a jaunty topping. Chocolate shavings (use a vegetable peeler and a bar of chocolate) are fine, too, but if you want to learn the fun technique for making chocolate shards, find the recipe in Baking Together #30.


Add fruit or nuts

Any type of fresh fruit – chopped into small pieces if necessary – can be scattered over the whipped cream (with or without the shards) just before serving. Consider strawberries, raspberries, pitted cherries, peaches or even orange segments (also called supremes). Pomegranate seeds add a splash of holiday color, too. Feel free to top with a few sliced almonds or chopped hazelnuts for a crunchy texture.


Layer the mousse, parfait-style

Crisp cookies like cinnamon grahams or chocolate or vanilla, or even peppermint Girl Scout cookies, can be used in between layers of the mousse. I prefer to crush them into small or fine bits. The layered mousse can and should still be made ahead, but much like an old-fashioned ice box cake, the cookies will soften into a cake-like texture (Yum!).


CHANGE UP THE FLAVOR

Orange

Add finely grated orange zest to the melted chocolate mixture and substitute orange flavored liqueur in place of the bourbon or vanilla extract. Consider sprinkling a little orange zest over the whipped cream (with or without the shards) just before serving.


Coffee

Add 1/2 teaspoon instant espresso or coffee powder to the chocolate and cream mixture before heating and substitute coffee liqueur in place of the bourbon or vanilla extract. Consider sprinkling some crushed chocolate covered espresso beans over the whipped cream (with or without the shards) just before serving.


Peppermint

Add a hint of pure peppermint extract to the chocolate mixture along with the bourbon or vanilla extract. Consider sprinkling some crushed peppermint candies over the whipped cream (with or without the shards) just before serving.