Use the printer friendly button

Use the "printer friendly" button when printing a recipe.

Sunday, April 27, 2025

Oregano Paprika Chicken Breast

Whether air frying or baking, it's the seasoning mix that makes this a standout.  It's just the right blend, perfectly balanced with tons of flavor.  This recipe calls for air frying, but you can just follow cooking guidelines for baking in the oven instead.

This foolproof recipe makes flavorful and tender air fryer chicken breasts every time, seasoned with herbs and spices.

Ingredients

  • 1 Tablespoon olive oil
  • 2 chicken breasts boneless and skinless
  • 1/2 teaspoon kosher salt *
  • ½ teaspoon oregano
  • ½ teaspoon paprika
  • ½ teaspoon black pepper
  • ½ teaspoon garlic powder

*If using Diamond Kosher Salt, increase the amount of salt used to 1 teaspoon to account for the fact that it has 50% less sodium than other salt brands. 

Instructions

  • In a small bowl, combine the salt, spices, and oil to create a paste. Coat the chicken breasts with the paste.
  • Place in the air fryer basket and cook at 370 degrees for 10 minutes. Flip the chicken and cook for an additional 4-8 minutes, or until the internal temperature reaches 160 degrees.  (The internal temp for cooked chicken should be 165 degrees, so stop cooking at 160 degrees and the center will continue to cook while it sits.)
  • Tent the chicken with tin foil and allow to rest for 5 minutes before serving.

Nutrition

Calories: 326kcal | Carbohydrates: 1g | Protein: 48g | Fat: 13g | Saturated Fat: 2g | Polyunsaturated Fat: 2g | Monounsaturated Fat: 7g | Trans Fat: 0.03g | Cholesterol: 145mg | Sodium: 845mg | Potassium: 870mg | Fiber: 1g | Sugar: 0.1g | Vitamin A: 325IU | Vitamin C: 3mg | Calcium: 24mg | Iron: 1mg

Saturday, April 26, 2025

Crunchy Sesame Tofu Salad

 This Crunchy Sesame Tofu Salad recipe is a flavor-packed, quick-fix meal made with crispy air-fried or baked tofu, raw veggies, and a zesty orange sesame dressing. The satisfying crunch and vibrant taste and color make this a stand-out anytime dish.


Ingredients 

Sesame Tofu

  • 1 block extra firm tofu, pressed for at least 20 minutes
  • 2 tbsp soy sauce
  • 1 tbsp toasted sesame oil
  • 1 tbsp cornstarch
  • 1 ½ tbsp sesame seeds
  • ½ tsp garlic powder

Orange Sesame Dressing

  • ½ cup freshly squeezed orange juice
  • ¼ cup avocado oil
  • 2 tbsp sesame oil
  • 2 tbsp rice vinegar
  • 1 tbsp smooth dijon mustard, or yellow mustard
  • 1 tbsp agave nectar
  • ½ tsp sea salt

Salad

  • 1 cup shelled edamame, also called mukimame
  • 3 cups finely chopped or shredded cabbage, about ¼ of a medium-sized cabbage
  • 2 carrots, shredded
  • 1 red bell pepper, stem and seeds removed, thinly sliced
  • ½ bunch of fresh cilantro, leaves and stems chopped (about ¼ cup chopped)
  • Salt, to taste
  • 2 tbsp sesame seeds, for garnish

Instructions 

Sesame Tofu

  • Cube the pressed tofu into ½-inch pieces and place it in a mixing bowl.
  • Pour the soy sauce over the tofu and stir. Then add the sesame oil and stir again. Sprinkle the cornstarch, sesame seeds, and garlic powder over the tofu and stir well.
  • To air fry: Transfer the coated tofu to an air fryer and cook at 375°F for 10 minutes. Stir the tofu, and air fry for more 3-5 minutes, or until crispy.
  • To bake: Preheat the oven to 375°F and line a baking sheet with parchment paper. Spread the prepared tofu evenly over the prepared baking sheet. Bake the tofu for 20 minutes, then flip and bake for another 10-15 minutes, until crispy.

Sesame Orange Dressing

  • While the tofu air fries or bakes, place all of the ingredients in a glass jar with a lid. Tighten the lid and shake until emulsified. Alternatively, you can whisk the ingredients together in a bowl.

Salad

  • In a saucepan over high heat, bring 2 cups of water to a boil. Add the edamame beans to the boiling water and cook for 5 minutes until tender. Strain the water from the beans and set aside.
  • Place the cabbage and carrots in a mixing bowl. Pour ½ cup of the orange sesame dressing over the vegetables. Use clean hands to gently massage the veggies until the cabbage is more tender, about 30 seconds. Season to taste with more dressing and salt.
  • Add the edamame, red peppers, and cilantro to the salad, and gently toss to combine.
  • Transfer the salad to serving plates and top evenly with the crispy tofu and sesame seeds.

Notes

Storage Directions

  • Crispy tofu salad recipes are best enjoyed right away. However, leftovers can be stored in an airtight container in the refrigerator for up to 3 days. Ideally, store the tofu and veggies separately. To re-crisp the tofu, reheat it in the air fryer at 375ºF for 5-7 minutes or in the oven at 375ºF for 10-15 minutes, flipping halfway through. 

Recipe Pro-Tips

  • Press the tofu well. For the crispiest tofu in the salad, press it thoroughly to remove as much moisture as possible. Use a tofu press or place the tofu on a paper-towel-lined plate with a heavy object set on top for at least 20 minutes. This helps achieve a crunchy texture, whether you bake or air fry it. 
  • Evenly season the tofu. When coating the tofu in the marinade, ensure that each piece is evenly covered with the seasoning and cornstarch mixture. This will help in achieving uniform crispiness when cooked.
  • Preheat cooking appliances. Preheat the air fryer or oven before adding the tofu to ensure even cooking and the best crispy texture. 
  • Massage the veggies. Gently massage the shredded cabbage and other vegetables with the dressing to tenderize them and enhance their flavor. 
  • Emulsify the dressing. For a perfectly blended dressing, vigorously shake the dressing ingredients in a jar with a tight lid or whisk them thoroughly in a bowl until they are fully combined and smooth. This ensures the dressing is emulsified, with a consistent texture and flavor.
  • Adjust the dressing to taste. The sesame tofu salad dressing can be adjusted based on your preference. Taste after mixing and add more seasonings, sweetener, oil, or vinegar as needed to balance the flavors.
  • Save extra dressing. If you have any leftover dressing, use it to season veggies, grains, or noodles. It will stay fresh for about 5 days after making. 

Sunday, March 2, 2025

Crockpot Beef Stew

Servings: 4 (1.25 cups each)
Prep: 15 min
Cook: 4 hours hrs 15 min on high, or 8 hours on low
Total:  4 hours hrs 30 min or 8 hours 30 min


 Ingredients

  • 1 lbs. red potatoes, diced ($2.40)
  • 0.5 yellow onion, diced ($0.37)
  • 1.5 carrots, sliced ($0.44)
  • 2 stalks celery, sliced ($0.44)
  • 2 cloves garlic, minced ($0.32)
  • 0.75 lbs. beef stew meat ($11.24)
  • 1 Tbsp all-purpose flour ($0.03)
  • 0.13 tsp salt ($0.02)
  • 0.13 tsp Freshly cracked black pepper ($0.02)
  • 1 Tbsp cooking oil ($0.08)
  • 1 cups beef broth ($0.27)
  • 1 Tbsp Dijon mustard ($0.13)
  • 0.5 Tbsp Worcestershire sauce ($0.06)
  • 0.5 Tbsp soy sauce ($0.06)
  • 0.75 tsp brown sugar ($0.02)
  • 0.75 tsp dried rosemary ($0.15)
  • 0.75 tsp dried thyme ($0.15)

  1. Dice the onion and red potatoes. Slice the carrots and celery. Mince the garlic. Place the prepared vegetables in a four or five-quart slow cooker.
  2. Place the stew meat in a bowl and sprinkle the flour, salt, and pepper over top. Toss the meat until it's evenly coated in flour.
  3. Heat a large skillet over medium-high. Once very hot, add the cooking oil and swirl to coat the surface of the skillet. Add the stew meat and cook, without stirring, until browned on the bottom. Stir and then allow the beef to brown on a second side. Transfer the meat to the slow cooker.
  4. Turn the heat under the skillet down to medium-low. Add the broth, Dijon, Worcestershire sauce, soy sauce, brown sugar, rosemary, and thyme to the skillet. Stir and cook over medium-low until all the browned bits have dissolved off the bottom of the skillet.
  5. Pour the broth over the ingredients in the slow cooker and everything a good stir.
  6. Place the lid on the slow cooker and cook on high for four hours or low for eight hours.
  7. After cooking the meat and vegetables should both be tender. Stir the stew well to allow the potatoes to slightly break down and thicken the gravy. Taste the stew and adjust the salt or other seasonings to your liking. Serve hot!

Sunday, February 16, 2025

Chicken Cacciatore

This dish has roots back in the Renaissance, when people hunted for food and only the wealthy could enjoy chicken. This is good when made with a whole chicken, but I prefer it made only with drumsticks and thighs. It can be made well in advance, and will reheat and remain moist. It is great with polenta or pasta, but I love it with a chunk of crusty semolina bread.   SERVES 6

Ingredients:

  • 1/4 cup dried porcini mushrooms, soaked in hot water, then finely chopped, liquid reserved

  • One 41/2-to-5-pound chicken, cut into 14 pieces (see note) 2

  • 1/2 teaspoons kosher salt Vegetable oil, for browning the chicken

  • 2 tablespoons extra-virgin olive oil

  • 2 medium onions, cut in eighths, attached at the root end

  • 3 stalks celery, sliced into 1/2-inch pieces on the bias 

  • 1 cup dry white wine 

  • 1 sprig fresh rosemary 

  • 28-ounce can Italian plum tomatoes, preferably San Marzano, crushed by hand 

  • 4 cups sliced mixed mushrooms (cremini, button, shiitake) 

  • 3 red, yellow, or orange bell peppers, cut into 1/2-inch strips 

  • 2 teaspoons dried oregano

Instructions:

  1. Season the chicken all over with 1/2 teaspoon salt. 

  2. Pour enough vegetable oil into a large Dutch oven to cover the bottom of the pan, over medium heat. When the oil is hot, brown the chicken all over in batches, about 2 to 3 minutes per side. Remove the chicken to a plate. Discard the vegetable oil.

  3. Add the olive oil to the pot, and bring to medium-high heat. When the oil is hot, add the vegetables. Cook, stirring occasionally, until the onions and celery are caramelized on the edges, about 5 minutes. 

  4. Put the chicken back in the pot, and pour in the white wine. Drop in the rosemary. Boil until the wine is reduced by half, then add the chopped porcini and the soaking liquid, omitting any gritty residue in the soaking liquid. 

  5. Once the liquid returns to a boil, add the tomatoes. Rinse out the can with 1 cup hot water and add that as well. Bring to a boil, and simmer to let the sauce come together, about 5 minutes.

  6. Pour in the sliced mushrooms, bell peppers, oregano, and the remaining 2 teaspoons of salt. Cover, bring to a simmer, and cook until the vegetables have begun to soften, about 10 minutes. 

  7. Uncover, and cook until the sauce has reduced and the chicken is tender, about 15 to 20 minutes more.

NOTE 

The chicken gets cut up as follows: two wings, two thighs, two drumsticks, back in two pieces, breast halves in three pieces each.


pg. 242 LIDIA'S ITALY IN AMERICA 


Sunday, December 22, 2024

Pan Seared Parmesan Crusted Chicken

Thin chicken breasts are coated in Parmesan, egg, and bread crumbs, and pan-seared until crispy! Kids love it and so do the adults.

Prep Time: 15 minutes

Cook Time: 10 minutes

Total Time: 25 mins

 Course: Main Course Cuisine: American; Keyword: pan-seared chicken, parmesan crusted chicken, skillet chicken 

Servings: 4

 Ingredients

  • 1 egg
  • salt and pepper
  • 1 teaspoon garlic powder
  • 1 teaspoon Italian Seasoning
  • 1 cup Parmesan cheese, (grated or shredded)
  • ½ cup bread crumbs
  • ¼ cup flour
  • 1 lb chicken breasts, (thin, 4 pieces)
  • 1 tablespoon butter
  • 1 tablespoon olive oil

Instructions

  1. First, paper towel dry the chicken and then prepare two bowls. One is for the egg, salt, pepper, garlic powder, and Italian seasoning.  Next, you should whisk the egg mixture slightly. 
  2. The second bowl is for the parmesan, bread crumbs, and flour.
  3. Now it’s time to dredge each chicken breast piece in egg/seasoning mixture. After that place in parmesan mixture and press. Turn to coat the other side of the chicken with parmesan mixture and press again.
  4. Repeat with remaining chicken pieces and place each coated parmesan chicken onto a plate or a cutting board.
  5. MELT butter and ADD olive oil on medium-high heat in a skillet (stainless steel, cast iron skillet or non-stick).
  6. PLACE COATED CHICKEN in skillet and cook for 3-4 minutes one one side. DO NOT MOVE chicken otherwise the cheese will slide off surface before it adheres! Press down lightly with a spatula.
  7. TURN WITH TONGS when the first side is golden brown and cook the other side for 3 to 4 minutes. Do not cook for more than a total of 6-8 minutes – just set the timer and flip when it beeps.
  8. CHECK FOR DONENESS to make sure the chicken is fully cooked and not pink. If not, lower the heat and cook for a couple more minutes.

SERVE immediately.


Full recipe on whatsinthepan.com

Saturday, November 9, 2024

chicken orange sesame salad


Ingredients:  
  1. 2 large Chicken Breast Cubed
  2. 5 cups Green Cabbage Shredded
  3. 2 Oranges Segmented
  4. 1 Avocado Diced
  5. 1 cup Green Onions Sliced thin
  6. 1/4 cup Cilantro Chopped
  7. 1 tsp Kosher Salt
  8. 1 tsp Black Pepper
  9. 1 tsp Garlic Powder
  10. 1 tsp Onion Powder
  11. 1/4 cup Slivered Almonds Toasted
  12. 2 tbsp Sesame Seeds Toasted
  13. 2 tbsp Olive oil

For the Dressing
  • 1/2 cup Sesame oil
  • 1/4 cup Maple Syrup
  • 1/3 cup Soy Sauce
  • 3 tbsp Rice Wine Vinegar
  • 3 tbsp Grated Ginger
  • 1 Orange Zested
  • 1 tbsp Orange Juice

Instructions: 
  1. Into a large bowl, add 2 diced up chicken breasts. Into the same bowl add 1 tsp of garlic powder, 1 tsp of onion powder, 1 tsp of kosher salt and 1 tsp of black pepper. Mix well.
  2. Place a large non-stick frying pan over medium heat. Add in 2 tbsp of olive oil and once heated, drop in your chicken. Cook for 8-10 or until all your chicken is golden brown and fully cooked. Remove from heat and set aside.
  3. Next up let's make the dressing. Into a mixing bowl add ½ cup of sesame oil, ¼ cup maple syrup, ⅓ cup soy sauce, 3 tbsp rice wine vinegar, 3 tbsp grated ginger, 1 orange zested and 1 tbsp of orange juice. Give that a mix and set aside.
  4. Into a large salad bowl, add 5 cups of thinly shredded green cabbage, your cooked chicken, 2 segmented oranges, 1 diced avocado, 1 cup of sliced green onions, ¼ cup of chopped cilantro along with ½ cup of toasted slivered almonds and 2 tbsp of  toasted sesame seeds. (Reserve some almonds & sesame seeds for garnish.)
  5. Add in your dressing and toss well. Garnish with more toasted almonds and sesame seeds.


Saturday, August 31, 2024

Coconut Martini

Do a little prep in advance to kick things up to the fine martini level! 

At least 15 minutes ahead of time, toast some coconut for the rim.  Then, prep the glass, rolling the rim in some honey, then in the toasted coconut.

Cream of coconut has a thick, fatty layer on top, with a thin liquid below. Spend some time mixing this well before adding it to the shaker.

Ingredients 
1 1/2 ounces vanilla vodka*
1 oz coconut rum 
1/2 ounce cream of coconut 
Splash of pineapple juice

* If no vanilla vodka is on hand, simply add some vanilla extract to regular vodka.  

Pour ingredients over ice in a shaker. Shake for the internationally recognized shaking time, then pour into the martini glass through a strainer.

Thursday, July 4, 2024

Potlatch Seasoning

Potlatch Seasoning Blend


Potlatch Seasoning Blend is a great all-purpose spicy seasoning for fish, especially salmon. This mix works equally well with chicken, pork, and vegetables. Easy to make with pantry spices.

Prep Time: 5minutes mins

Ingredients

  • 2 teaspoons kosher salt
  • 1 teaspoon paprika
  • 1 teaspoon chili powder
  • 1 teaspoon dried oregano
  • 1 teaspoon black pepper
  • 1 teaspoon crushed red pepper
  • 1 teaspoon garlic powder
  • ½ teaspoon celery salt
  • ½ teaspoon cumin

Instructions

  • Combine all ingredients in a resealable jar, shake well to combine.
  • Store in a cool dry place for up to 3 months.

Notes

  • If you are salt sensitive then add everything together and add as much salt as desired
  • Well sealed, the spice mixture keeps for about 3 months
  • This recipe can be doubled, tripled, and quadrupled

Nutrition

Calories: 18kcal | Carbohydrates: 4g | Protein: 1g | Fat: 1g | Saturated Fat: 1g | Sodium: 7593mg | Potassium: 98mg | Fiber: 2g | Sugar: 1g | Vitamin A: 699IU | Vitamin C: 3mg | Calcium: 38mg | Iron: 1mg

Saturday, April 13, 2024

Perfect Margarita


 ingredients

1 serving

1.5 oz Tequila

1 oz Citrónge Orange Liqueur

.75 oz Fresh lime juice

.25 oz Simple syrup

+ Lime wedge for garnish

+ Kosher salt (optional)

how to make

Combine liquid ingredients in a cocktail shaker and shake vigorously with ice to chill.

Strain onto fresh ice in a rocks glass and garnish with a lime wedge.

Optionally, salt half the rim of the glass with kosher salt

Monday, September 18, 2023

Veggie Fried Rice


Garden veggies never had it so good.

BY SUSIE MIDDLETON, Martha's Vineyard Magazine

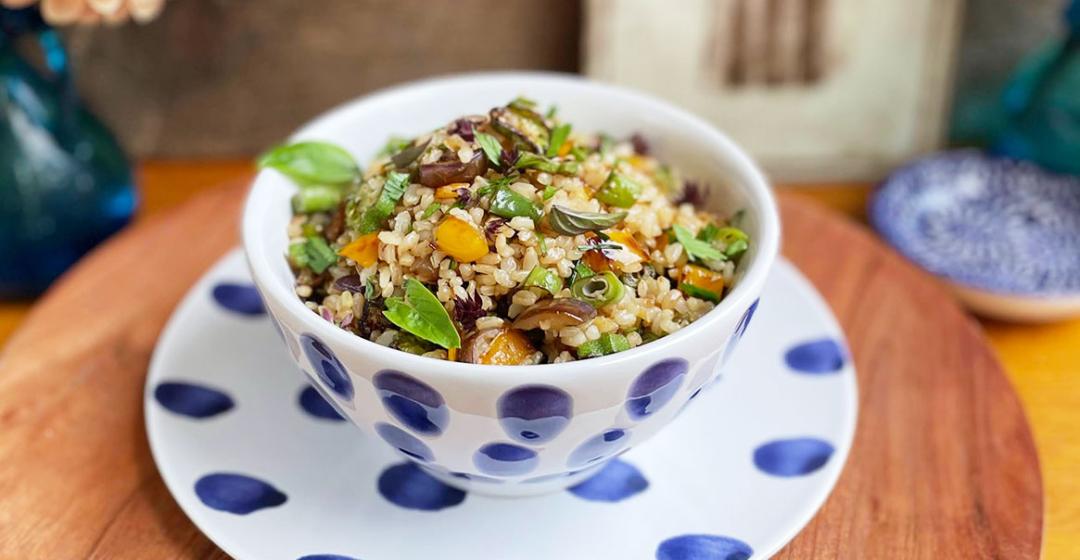
Use this fried rice recipe as a template and make it with your choice of seasonal veggies. It’s especially good for using up small bits of leftover veggies in your fridge or as a destination for summer garden veggies.  I developed this recipe (based on my Gingery Fried Rice with Broccoli or Asparagus recipe) to help you reduce food waste in your kitchen, so don’t be shy about using thinly sliced broccoli, cauliflower, or Swiss Chard stems in this (in addition to florets and leaves). Radish tops or beet greens, thinly sliced, can go in, too. I always include a bit of either onion, bell pepper, or mushroom if I can, as those aromatic veggies give off moisture as they cook and help soften the other veggies. Green beans, asparagus, bok choy, okra – they’re all good! The photo at top shows a summer version with green beans, peppers, Fairy Tale eggplants and okra. The photo below shows a spring version with asparagus and chard stems.

Recently my stir-fry pan died and I've been temporarily using my large nonstick skillet instead. Since the skillet has more surface area, I'm finding I need a little bit more oil than I do with the stir-fry pan. Use your judgment and add what you think is best, but be judicious. 

I like to keep this rice vegetarian, but when I’m cooking for my carnivore, I add some diced ham into the pan with my vegetables when I begin the stir-fry.

If you’re in a rush or don’t have the ingredients for the little sauce, you can skip it and just add soy sauce (and maybe a squeeze of lemon or lime) to taste at the end.

Ingredients

For the sauce

  • 1 tablespoon plus 1 teaspoon low-sodium soy sauce
  • 2 teaspoons sherry or mirin
  • 2 teaspoons Chinese oyster sauce
  • 1 teaspoon brown sugar
  • 1/4 teaspoon Asian chili-garlic sauce

For the rice

  • 1 to 2 tablespoons vegetable oil (grapeseed is perfect for high-heat cooking)
  • 2 generous cups thinly sliced or small diced vegetables (your choice, include a bit of onion or bell pepper)
  • Kosher salt
  • 2 to 3 teaspoons minced fresh garlic 
  • 2 to 3 teaspoons minced fresh ginger (optional)
  • 1/3 cup thinly sliced scallions or chives
  • 2  to 2 ½ cups cold cooked short grain brown rice 
  • 1 to 2 tablespoons chopped fresh parsley, mint, cilantro, or a combination
  • 1 to 2 tablespoons toasted sesame seeds, toasted sliced almonds, chopped peanuts or any nuts  
  • 1 egg, cooked into a flat omelet and cut into strips (optional)
  • Lime or lemon wedges 

Instructions

For the sauce

1. In a small bowl, mix together the soy sauce, sherry or mirin, oyster sauce, 2 teaspoons water, brown sugar, and chili-garlic sauce.

For the rice

1. In a large (12-inch) nonstick stir-fry pan (or large nonstick skillet), heat the 1 tablespoon of oil over medium-high heat.

2. When the oil is hot, add the vegetables and 1/2 teaspoon salt, turn the heat to high, and cook, stirring, until the veggies are crisp-tender and all the pieces are lightly browned, about 4 to 6 minutes. Add a teaspoon or two more of oil if necessary.

3. Add the garlic, the ginger (if using), and half the scallions or chives. Stir-fry for 30 seconds to 1 minute.

4. Add the rice and cook, stirring and breaking the rice up with a spoon, until the rice is heated through, broken apart, and slightly “toasted” (you will hear it crackle), 1 to 2 minutes.

5. Carefully pour in half of the sauce, and stir until well incorporated. Immediately remove the pan from the heat. Taste and add a bit more sauce; you may not need it all.

6. Stir in the herbs and transfer the rice to a serving bowl or plates. Garnish with the remaining scallions, nuts, and egg strips (if using). Serve with lemon or lime wedges.

Saturday, June 24, 2023

Garlic Parmesan Brussels Sprouts


Jazz up your Brussels Sprouts with a kick of garlic and freshly grated cheese - making this simple side dish one that the whole family will love!


Recipe Shorthand:

  • Add the prepared Brussels sprouts to a sheet pan.
  • Drizzle with olive oil.
  • Add sliced garlic, grated Parmesan cheese, and season with salt and pepper.
  • Toss to evenly coat.
  • Roast at a high temperature until crispy and golden.

Recipe Overview:

  •  Course:  Dinner
  •  Cuisine:American
  •  Prep Time: 5 min
  •  Cook Time: 20 min
  •  Total Time: 25 min
  •  Servings: 4 servings
  •  Calories: 167
  •  Author: Erren Hart

Ingredients

  • 1 pound Brussels Sprouts Cleaned and trimmed
  • 3 cloves garlic peeled & sliced *See the notes section before starting
  • ¼ cup Parmesan Cheese Freshly grated
  • salt and freshly ground black pepper To taste
  • 3 tablespoons good quality olive oil or for Keto, butter flavor coconut oil

Instructions

  • Preheat the oven to 400°F/200°C.
  • If needed, clean and trim the Brussels sprouts and cut them in halves and place them in an oven safe dish. Make sure to dry them very well before cooking.
  • Add the garlic, Parmesan cheese, salt, and pepper, followed by the olive oil.  Toss to coat.
  • Roast in the oven uncovered for 20-25 minutes until crisp, brown and caramelized on the outside and tender on the inside. Serve with more grated cheese.

Notes

  • *This recipe makes very crispy garlic.  In some ovens, it could burn or become bitter.  If you are worried about the garlic getting too dark for your liking, slice it thin and add at the last 5-7 minutes of cooking time, coated in a little oil, and scattered around the pan.
  • For less crispy cheese, add it for the last 10 minutes.
  • To keep your sprouts from sticking, line your pan with nonstick foil or baking paper.
  • Dry your Brussels sprouts well.   The drier they are, the crispier they’ll be. If washing, use paper towels to pat them dry or use a salad spinner to spin that liquid right off.
  • For crisper sprouts, spread them out on the pan without too much touching. Overcrowding causes you to steam the Brussels sprouts instead of roasting them.
  • Cut the sprouts into even-sized pieces if you want them to have a similar texture. 
  • Be sure to start with a hot oven to help the sprouts crisp on the outside and soft on the inside.
  • Brown is good. If you’ve never cooked Brussels sprouts this way, at first glance, you may think it looks burnt out of the oven, but once you taste it, you’ll know those little “burnt” areas are the best-tasting parts!
  • When using untrimmed Brussels sprouts, trim off the dry part of the stem at the base of the sprout and any loose outer leaves. 
  • For an extra caramelized area, place the sliced Brussels sprouts cut-side down on the pan.  This will give a larger browned surface area.
  • Leave smaller sprouts whole to avoid overcooking.
  • On smaller sprouts that don’t need to be halved, slice a cross in the stem (see the video). The stem is the toughest part of the Brussels sprout, and the cross allows them to cook at the same rate as the tender area.
  • For an extra kick of flavor, try adding lemon zest before roasting and a squeeze of fresh lemon juice before serving.
  • Be sure to taste and season well before serving.

Nutrition

  • Calories: 167 | Carbohydrates: 11g | Protein: 6g | Fat: 12g | Saturated Fat: 2g | Cholesterol: 4mg | Sodium: 120mg | Potassium: 450mg | Fiber: 4g | Sugar: 3g | Vitamin A: 899IU | Vitamin C: 97mg | Calcium: 119mg | Iron: 2mg

Fall-Apart Roasted Pork Shoulder with Rosemary, Mustard and Garlic

A super tender slow-cooked, marinated pork shoulder or butt roast recipe.  

I used this seasoning combo and sauteed some medallions of pork shoulder (left over from a pulled-pork taco night with the extended family) and it was DELICIOUS.  

Overview:

  • Prep Time:  20 mins
  • Cook Time:  6 hrs
  • Marinating Time: 2 hrs
  • Total Time: 8 hrs 20 mins
  • Diet: Gluten Free 
  • Servings: 12 People 
  • Author: Katie Workman 
  • Cost: $30

Equipment

  • Food Processor
  • Instant Read Meat Thermometer

Ingredients

  • 2 tablespoons chopped garlic
  • 3 anchovies, rinsed
  • 2 tablespoons chopped fresh rosemary
  • 2 teaspoons kosher salt
  • 1 teaspoon freshly ground pepper
  • ¼ cup olive oil
  • 2 tablespoons coarse Dijon mustard
  • 1 6-pound boneless pork shoulder trimmed of excess fat and tied

Instructions

In a small food processor combine the garlic, anchovies, rosemary, salt and pepper. Add the olive oil and process until it forms a paste, scraping down the sides. Remove the blade and use a fork or spoon to stir in the mustard. Rub the paste all over the pork shoulder, loosely cover it with plastic wrap, and refrigerate from 2 to 24 hours.

Preheat the oven to 450°F and bring the pork to room temperature while the oven heats. Place the pork in a shallow roasting pan and roast, uncovered, for 30 minutes, until the top starts to brown a bit. Turn the heat down to 250°F and continue to cook, uncovered, for 6 to 8 hours until the middle of the roast registers 180°F. on an internal thermometer, and as you slide the thermometer in you can feel that the meat is very tender throughout. If there are juices in the pan (and I have found that sometimes there are and sometimes none) pour off the juices from the pan into a heatproof container, like a Pyrex measuring cup. Place this in the fridge, where the fat will rise to the top, while the meat rests.

When the meat is cooked, if you think that the outside of the roast could use a bit more crust/brownness, turn the heat back up to 450°F and let it cook for another 15 to 20 minutes, to give the outside a bit more of a crunchy texture.

Remove from the oven and let sit for about 20 minutes. Spoon the fat off the reserved juices in the fridge and pour the cooking juices into a serving pitcher or bowl (warm it a bit in the microwave or in a small pot if you like). Slice the pork as thinly or thickly as you like, knowing the meat will fall apart at least slightly. Sprinkle the sliced meat with a bit of salt before serving, and pass the pan juices on the side to drizzle over.

Notes

You can also make this recipe and others like it with a pork butt roast or Boston Butt pork roast, which are actually also from the shoulder area, a little further up, but essentially a similar cut of meat.  

Nutrition

Calories: 333.64kcal | Carbohydrates: 0.75g | Protein: 51.55g | Fat: 12.39g | Saturated Fat: 3.09g | Cholesterol: 136.68mg | Sodium: 539.9mg | Potassium: 869.92mg | Fiber: 0.2g | Sugar: 0.04g | Vitamin A: 9.75IU | Vitamin C: 0.49mg | Calcium: 22.27mg | Iron: 2.17mg

Recipe from TheMom100.com